Many moons ago the quarterly Scouting magazine used to be a bi-monthly publication which had a supplement relevant to the section the reader was with. Not only did I get the Cub Supplement but I did a few articles for it, and indeed the main Scouting magazine too.
This one, for an origami cooking pot, appeared in the August/ September 2011 edition. Back in the day it was possible to link to the article online but all the links are annoyingly now 404 errors which makes me ponder the point of doing them in the first place but I digress...
The above picture is a screen grab from the Scout Association's collection of publications on the Issuu website. As you can see there are only five main steps to making a 'pot' but being a small picture it's hard to see the steps in detail so I'll reproduce them again.
Take a piece of square or rectangular paper, the shape of the paper, of course, will alter the pot dimensions. I am using origami paper and it is 19 cm x 19 cm for reference. the corner is being turned up in this picture to demonstrate that origami paper is coloured/ patterned on one side, and white on the other.
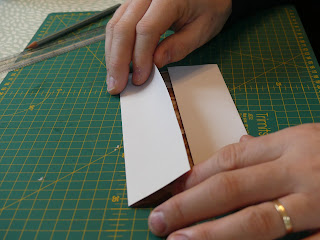
Firstly fold both sides into the middle and score the fold.
Then fold a small parallel strip on the two folded halves (about 1 cm in this case). again score the folds.
Now fold the four corners in (as shown) to where the small parallel strip starts and yes, score well.
Once the corners are folded in fold the strips over so that the corners are secured under them as shown.
The basic folding is done, now to cajole it into a container. Place your index fingers under both corners inside the pot and your thumbs correspondingly on the outside. Gently tease the corners upright. Once done gently crease along the edge like in the picture.
Repeat on the other side. To help the shape also gently crease all of the corners
This will be what your finished pot will look like. This 19 cm x 19 cm piece of origami paper ended up with the length being 11.5 cms, the width 9.5 cms and the depth being 3.5 cms.
This shape of container can also have a practical use. You can see in the Cub supplement that there is a finished one made out of tin foil, it was OK for finishing off half-cooked chipolatas and the like (if greased) during a Cub meeting but a twin layered container can be made to extend it's usefulness. This is a union of tin foil and parchment (greaseproof) paper with the foil a little larger and cut to the shape of a cross which effectively makes some flaps to fold over the parchment.
Once the foil edges are folded over the pot can be made as above.
And this is the finished container with the origami paper one for scale. It started out A4 size and it's vital statistics are L 15 cms W 8 cms and H 7 cms. it is quite a useful place to store, say, cooked vegetables or potatoes when I am using a Primus pan and need to cook protein or something in a sauce and then add the reserved stuff back in.
There was a reason I chose a piece of origami paper with the 'crumpled brown paper' side as it looks like the object of my doing this blog, I was going to try and make a birch bark origami pot.
I collected copious amounts of Himalayan Birch bark (Betula utilis var. jacquemontii) but it was rather crinkly around the edges so I gave it a soak in tepid water, it seemed to make the pieces more biddable.
I sorted through the prepped bark and took the three largest pieces I had and stuck them together to make a birch bark laminate. I then made a parchment paper template to maximise the biggest area. Once worked out I drew little lines across the edges at a right angle and trimmed the bark afterwards using these lines as guides.
So I'm nearly ready to fold it. This is where the origami paper reference kicks in. The bark is darker on the inside surface so there will be a natural contrast in the colour of the sides. Before I started I paid attention to the edges and used PVA glue to seal them. The tactile feel of this laminate was not too dissimilar to the inner bit of a puff pastry pie lid.
Once glued I paper clipped the edges to encourage a good bond.
And eyes down for yet another origami run through to form a handsome birch bark pot. The flaps that hold the corners in just needed a little PVA glue under them to secure the pot's integrity.
And there it is. Having a three ply laminate gives the pot a lot of strength and this picture clearly shows off the difference in colour between the outer and inner side of the bark. The only downside is that I now need to go and source some large pieces of Himalayan Birch bark to make some more. Future ones would look good with birch bark pitch gluing the edges and I did consider stitching the rim with artificial sinew for both aesthetic and tensile reasons. This dinky container is length 9 cm, width 4.5 cm and 2.75 cm and height for reference.
Suggested further reading:-


No comments:
Post a Comment