
This short video clip shows me launching it on the day, they work on the same mechanical advantage principle as those cupped ball launchers that dog owners use but the cup is a point and the ball is a dart with a concave depression at the rear and effectively makes your arm longer.

Now I know how to make one I'd just never got round to it, partly because I found it hard to believe that a tiny union at the back of the set (with a changing angle) would propel the dart with any meaningful velocity, silly really because they have pretty much been around since man started making tools so I purchased some wood from a DIY store. I got two sizes of pine dowel which measured 12 mm and 18 mm x 2400 mm (about a third/ two thirds of an inch x a smidge under 8 ft in old money) I cut the lengths down to about 1850 mm (or just under 6 ft 2 ") which is the same as the dart I made with Will. I have looked in several different outlets and the quality of the wood has often been varied and whilst all the 12 mm stuff was always flexible, the 18 mm flexibility was a bit more hit and miss.
The Yew launcher we made (the bit which is the actual atlatl) has the point mounted in the widest face on the wood, whereas I decided to turn this rectangular strip wood (also pine and measuring 15 mm x 36 mm x 900 mm) on it's side and just carve it to shape with the point being part of it.

Compared to the Yew atlatl the stripwood is about 130 mm longer than is needed so I formed the point up the 130 mm mark. Initially I planned to leave the 'waste' part attached so that I could reform the soft point in case it blunted but I left about 80 mm in the end because the atlatl felt a little unbalanced.
I cut it using a jigsaw and once the thrower's point was formed I offered up the end of the dart to mark where it laid along the launcher. I then marked a parallel line under this and cut the waste away so that there would be a gap between the dart and launcher. The handle is a little thinner than the launcher shaft so that I can get my fingers comfortably under the dart.


The cutting out of the launcher was fairly quick and I probably spent as long drawing the shape on as I did cutting it out. I used a fixed blade knife to trim the edges at 45 degrees and the gave it a light sand along it's length. This sort of launcher can also be fashioned out of a branch with a smaller twig protruding at about thirty degrees to the horizontal to make the point with. The above right hand side picture is a side-by-side view of the Yew and strip wood atlatl launcher tips. You can add some sort of strapping the the handle (like a Wii controller), and whilst I may retrospectively fit one I haven't ever thought that the atlatl was ever going to slip from my grasp.

As previously mentioned the original one is tipped with a sharp crested flint blade but this is to be an 'everyday' set and whilst I don't want a sharpened point I have sloped the sides of the tip slightly so that it is a little more aerodynamic.


At the rear of the dart I made the conical launching socket by marking the centre and then carefully drilling it with a counter sinking drill bit (the ones used to flare a drilled hole to make a screw head sit flush). If I had used freshly cut wood I may have needed to straighten the shaft a little, this is usually done by warming over a fire and then bending it. As a result this often leaves behind minor burn marks so to add a little authenticity I patterned the darts and the smaller lengths I was also working on by gently scorching it.


All that remained was to add some flights and get out there to do an initial test. I decided to make some (very) rough and ready flights from masking tape mounted on a roll of tin foil to test it; Was the dart too thin? Was it heavy enough? Was the launcher up to the job? I thought the answer was yes to all the questions but I wanted to check before I added some more robust and permanent fletchings.
I've also added a shot of the loaded dart in the atlatl launcher (above) to show the parallel cut. I could have made it so that it rested on the shaft with the tapered handle to get my fingers under but I wanted it to be able to potentially launch larger darts too (although it would have worked it was the aesthetic angle I was thinking of). Despite being fairly thin softwood projectiles they do fly a decent distance but would obviously benefit from some weight being added to the tip if a longer flight is desired.

This is how Will suggested that we tip the dart that we made on my 1-2-1 by carving a channel at the tip which he called an elbow.

The idea is that a flat(tish) weigh like a stone, or this partly knapped piece of flint can be adhered to the flat surface and then bound on. It is worth noting that this particular dart is a larger 18 mm diameter piece of dowel, personally I think the 12 mm stuff is a tad too thin to be cutting.
And this is a short video clip of one of the 12mm diameter darts being launched. Even though I wasn't launching them hard or with a run up it is clear from the clip just how quickly they fly, and remember this one has no added weigh apart from the fletchings. Note the arm action is an up and over in line with the darts intended trajectory, and the other hand forms a V shape to support it and is pulled out the way as the dart is launched.

Notice the bend in the dart as it leaves the atlatl in this video still which highlights why flexible darts are better suited to an atlatl launcher.


And there's a sort of smaller version of an atlatl that I've made before; Dutch arrows (with several other names besides) but instead of an atlatl launcher they are powered by knotted cordage. The useful thing about cutting down a long length of dowel to a make an atlatl launched dart is that the off-cut can be made into a Dutch arrow. The 12 mm off cuts in this instance are 550 mm (about 1 foot 10 ") but can be longer.
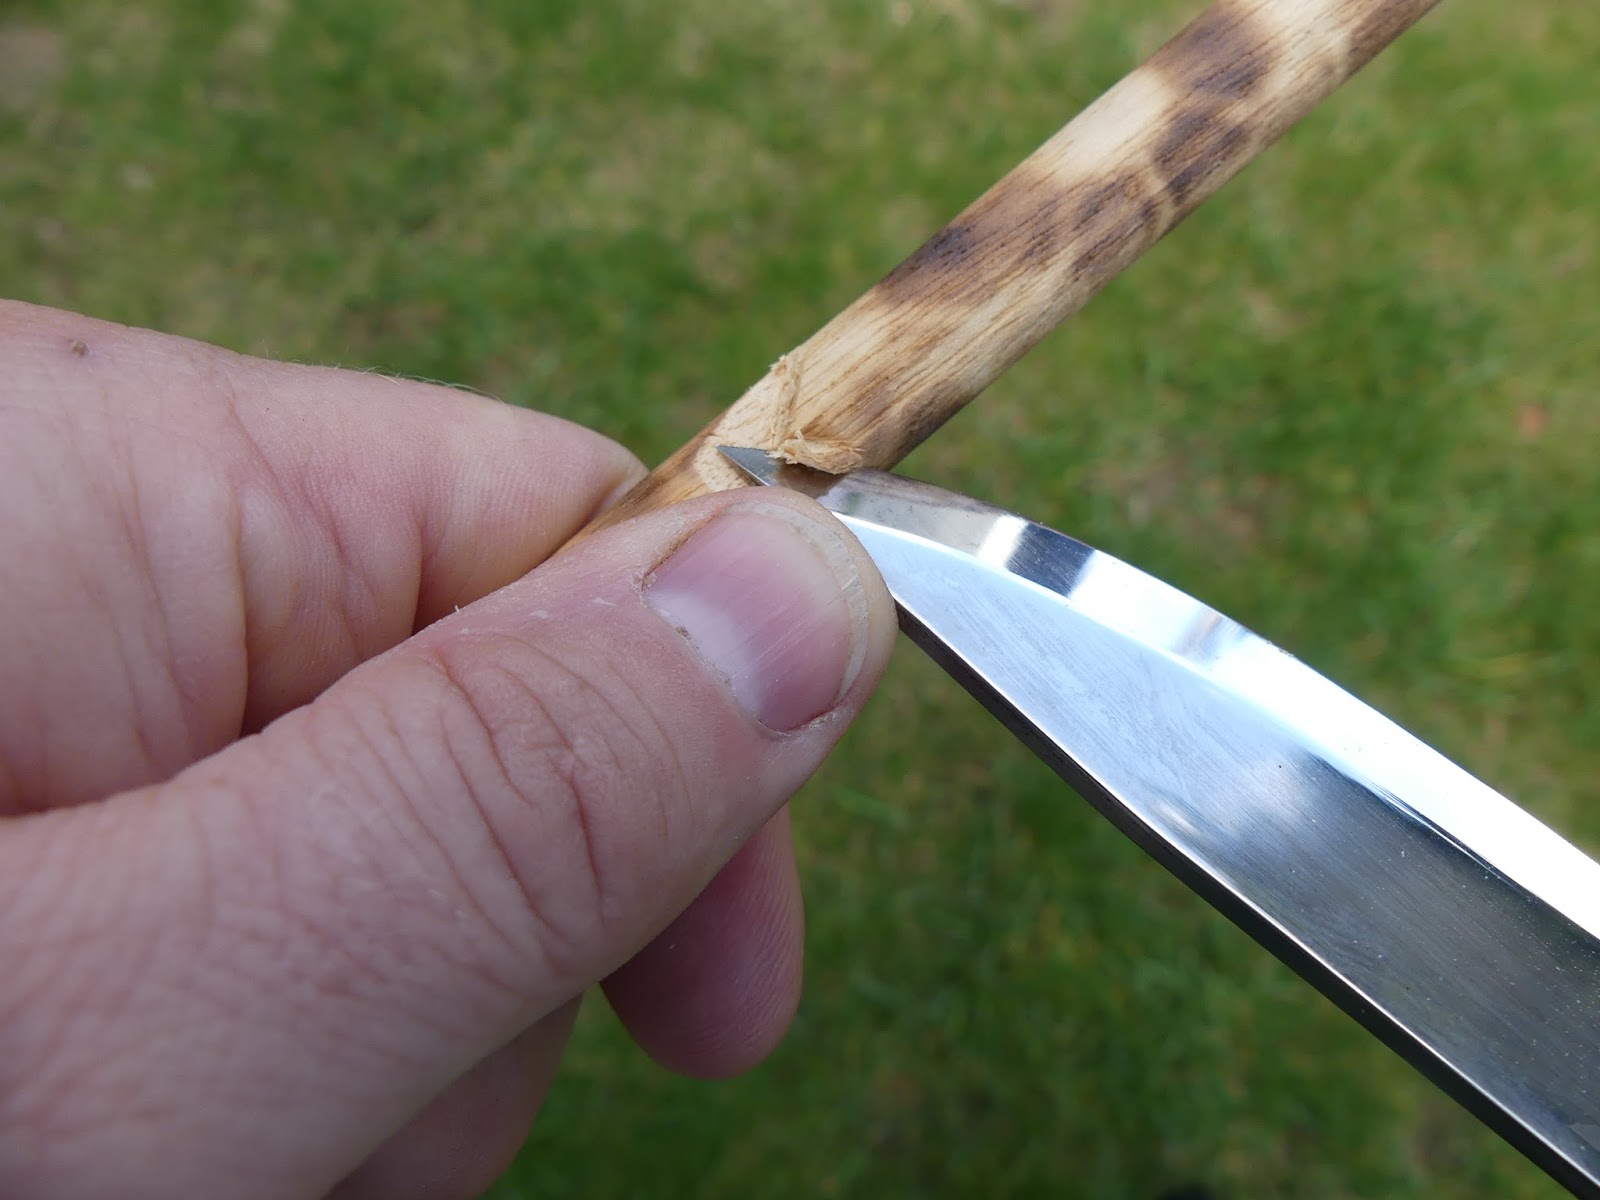
Firstly make a small V-shaped notch about a third of the way along from where the flights will go with a controlled knife cutting action, don't go in too hard if you are using a pine dowel as it is a rather soft wood. You only need to make a small V-shaped notch and you'll only need to go in about, say, a third of the way. For structural reasons don't cut beyond half way or you may end up with a two part projectile. I make the side nearest the tip quite steep, and the side nearest the flights/ fletchings quite shallow to help with launching, but more on that later.

To do a preliminary test with this length I fashioned some more basic flights from masking tape and if you aren't going to use feathers you can fashion something like this, or carefully cut a slot down the centre and insert something like a playing card. They don't need anything very technical if a lot of work is not desired. Note my left thumb is near the notch.

You will also need some cordage (such as paracord) which you will use to launch the Dutch arrow, and I find as a rule of thumb that the cordage should be at least the same length as the dart. Tie a stopper knot in one end, an overhand knot in this case.

To launch the dart you'll need to lock the cordage in position. Align the knotted end in the v shaped notch as shown. This picture is also relevant to the launch but more on that later...

Once the knot is in position lift the working (dangling) end of the cordage under and over the shaft of the Dutch arrow. For reference the fletchings are to the left of the picture.

And then bring it across just above the top of the knot and along the shaft towards the front of the Dutch arrow. This locks the knot, and therefore the cordage in place to launch with.

Keeping the knot locked in place you then wrap it a couple of times around your index and middle finger and hold it a short distance from the front end. Once it is launched with a positive and slightly upwards angle the cordage will release from the shaft as it changes from the front to the rear, hence the fact that the first picture in the sequence was mentioned because it is very similar to the post launch position. This is why the side nearest is the front is flatter (to give the cordage some purchase), and the one nearest the flights/ fletchings is shallow ( to allow the cordage to exit cleanly). I guess it would still work with a narrow notch but it seems sensible to use the irregular one to me.

There is a slightly different method of launching that requires a different notch to be cut. Called a beaked notch. Again, the flights are on the left hand side in the pictures for reference. You cut an X shape with your knife, then slowly slice from one end of the X to the other lengthways to form the 'beak' which needs a diagonal bias to the cuts as you form it. There is more information about beaked notches in this bowdrill article.

The finished beaked notch viewed from the side


The reason for this more angled notch over a simple V-shaped notch is that the cordage is looped equally around the 'beak' which a V-shaped notch wouldn't support. As both ends of the cordage are wrapped around fingers I tie a second overhand in the other end.


The launching method is essentially the same as before but has more of a slingshot feel about it. The beaked notch can also be used to launch a dart with the previous method too.
And to finish the section a short video of a Dutch arrow being launched, the action being pretty much the same one that launches a paper plane. I tipped this one with a little blob of Blu-Tack to give it a little more zip, and used hi-viz paracord so it can be seen during the launch.

As mentioned in the notes above, the paracord can be seen pointing forwards which frees the overhand knot, allowing the dart to follow it's trajectory.


When it comes to fletchings I'll start by saying that when I put flights on, I have ten bananas for digits so what I am angling at is that what I do works for me but probably doesn't warrant close scrutiny in terms of authenticity. But that said these are only hobbyist darts, it's not like I'm hunting Elk with them. It is possible to make darts without flights, indeed this spear that Will made is without and he lent me one with fletchings to initially practice with but I'm all for fletchings, from an aesthetic angle if nothing else.
I've got three Buzzard feathers to use on this example, the same number of fletchings that an arrow has, but equally two fill suffice too. I trimmed the three quill ends to roughly the same length, and one feather is slightly smaller than the other two so I offer this up to the end of the shaft to work out the position of the end of the feather just back from the end. I marked the spot where the quill end finished with a pencil.


I've made a basic pattern on a piece of paper which is a hole with three equally spaced markers on so that I can pencil on where the flights should go on the shaft. Once marked you can then use a knife shave a small, shallow channel where the quill end will sit so that it is flush. Optional for a hobby set but it's an easy step and makes things look a little neater when the ends are eventually bound.


Slit the quill through the middle using a craft knife. They are quite tough but on the underside there is a useful channel to aid cutting. The tip is a little harder to do as it gets a bit thin. Trim all the quill tips to the same length and you'll then see that they fit nicely into the channels you have cut for them.


I've used a very non-bushcraft elastic band around the trimmed quill ends just as a temporary binding because they grip well but are easy to remove when needed. Adhesive wise I find PVA the easiest, I like using pine pitch glue but my afore mentioned banana fingers do find it a bit of a bind (excuse the pun) to be honest.
I use a simple whipping to secure the quill ends and once started it is easy to slip the band off. Note the black cotton thread secured in the whipping for binding the flights that is just visible in the above right hand side picture. If you can't do whipping then lay the cordage diagonally and glue it before wrapping the cordage around the shaft to the desired spot. Raffia is excellent, as is Lime Bast and Nettle cordage.

To bind the fletchings to the shaft I thread the sewing yarn onto a needle and poke it through at the base of each feather which I find causes minimal disturbance to the vanes and you aren't then trying to tease the barbs together again. Feathers look great, but equally card and insulation tape can do the job too.

And the highlighted scorch marks on the shafts of the darts/ arrows? Easy, use a heat gun that you'd usually employ to blister and remove old paint. It goes without saying that these beast get extremely hot at the business end and indeed be mindful if you swop a dart around because the wood retains the heat for some time too.
Keep the paint gun moving or you will end up with a pattern of the end of the gun on the wood, but that said I deliberately used this to my advantage on the Dutch arrow with the beaked notch earlier. I'm sure I don't need to state the obvious but this project uses tools that can burn and cut you, and safe usage of the atlatl darts and dutch arrows is paramount.

A selection of large, medium and small darts with natural and man made fletchings
If you want any further reading then look at Bushcraft and Survival magazine in which Jason Ingamells has done two how to articles which also have a lot of indepth history of the atalatl (issue 46) and Swiss arrows (one of the Dutch arrows other names) in issue 47. Also in the earlier issue 23 the atlatl is covered by Fi Danks and Jo Schofield, and in issue 38 throwing arrows are written about by Ian Cresswell.
And in the Bushcraft magazine Spring 2007 the atalt's history is covered, and a set is made in the Summer 2007 issue. Finally, there is a large academic paper here that goes into scientific depth


