
This is one of two blog pages I've decided to do to go through the making of the poshcraft jerky tower. I was going to be the only one but I've deliberately included every detail and thought along the way to help anyone who decides to make one themselves. I then decided to do a this shorter, punchier page to go through the basics. This one is like the quick set up guide you often get with electrical goods, this one is the directors cut film DVD with outtakes and bloopers as extras, a Cromwellian warts and all if you like. So without further ado...

Gilwell 24 2012 was a wet one, a very wet one. The bushcraft base that a group of scouters organised was a wash out, as was my big naturally built jerky set up. We had Derek from the Jerky Shack was along too and his canvas covered box jerky set up, the turquoise box seen left of centre in the above pic, worked on despite the incessant precipitation. Whilst I had this method of producing homemade jerky I decided that I needed something like that in the future but a little more elegant.
Derek suggested that nylon should be avoided (so bang went an old car cover) but as luck (or 'luck') would have it I discovered one of three parasols I had at home had mouse damage. It had several undamaged panels and then it was full steam ahead. I started to formulate a basic design in my mind I knew that each stage of the project would probably guide the next.
I settled on a double panel and two singles to make a four sided obelisk. It meant that two panels together have no gap to let smoke through and that I could look to design it so that the two single panels could be rolled back or removed if the conditions were favourable.


Cutting the panels out on the other side of the stitching would also mean that I could look to create a flap with the view to it overlapping the next panel to cover any gaps through which smoke could escape.
So off came the finial and the cutting began. As you can see in the rhs picture above the original panel stitching is to the left of the scissors and the mouse damage to the right in the top corner. This is creating the overlap strip of an inch or so on the waste side. As previously mentioned, I could run the edge through a sewing machine and create a small flap to fit over the gaps between panel to help keep the smoke in.
I decided to leave the cut pieces attached to the apex section of the parasol and see if I was workable, because as luck would have it the panels were all symmetrical. Time would tell if I needed to make individual panels or whether I could keep it as one and pleat it as required. I was keen to keep it as one because of the ease of throwing it over a stand, and I could also secure it with the finial.
I had originally envisaged using hazel poles but it occurred that there were some good lengths of wood within the stripped parasol so I decided to look at using them. They were fastened by a stout piece of twisted wire around a circular fixing not unlike a sailship's capstan so I undid it and set about freeing up the longer lengths.

If I was going to use the parasol wood then the longer lengths would need overlapping and bolting together. I also had my eye on the metal pin that held the parasol in place when it was used with the view to it supporting a small fire pit to provide the smoke.


Before I ran the edging stitches on the panel flaps I drew out a diagram to make sure that they overlapped each edge, and where to put metal eyelets to secure them. The paperclips where used to show me where to cut and stitch.


I wanted the meat to be about chest height if possible (although it ended up in an upper torso position) so I bolted the lengths together to make a combined leg length of sixty four inches. With the basic four sided jerky tent in place (seen above with a metal ring inserted top and bottom of each panel and tied with paracord 550) it came to a height of sixty inches from floor to finial tip and the footprint is around four feet squared.
The parasol material is probably similar to other designs in that the lower edge of the material has little pockets into which the umbrella like wooden spokes sat to tension the material when the device is on I decided to cut a small channel on the top one to accommodate the parasol as before, albeit the material would need to be twisted through 90 degrees to fit but I messed this up and this therefore meant I was going to have to use metal eyelets and paracord to tension it.


Even allowing for the mess up over the tensioning it was fairly straight forward to this stage, but now the playing around and a situation where one idea was quickly usurped by another took place. The two shots above typically show how I envisaged the single panels being rolled up and somehow secured, and the internal space of the cover with my foot as scale.

Using something like metal skewers or de-barked hazel lengths to secure the jerky weren't really considered as there would have been issues with the snug fitting canvas knocking them off, so I planned to use a sturdy old barbecue grill and I decided that the most durable way of securing it would be to use adjustable jubilee clips. I whipped some paracord 550 around the spot I though the clips would need fixing, this was initially to increase the diameter that the clips had to grip on, but it also helped to keep them from biting into the wood. There is a simple whipping how to on the longer version page.

Whilst working on this project it did start to occur that one possible weakness was the fact that, as with all similar jerky setups, smoke could blow under the canvas pyramid with even the slightest breeze (note that three sides of the au natural jerky tower that I knocked up on the bushcraft base at Gilwell24) above needed a light thatching to prevent an almost unnoticeable yet unpredictable breeze blowing the smoke three ways). I used the mouse damaged offcuts to create two extra patchwork panels with my limited sewing machine skills to use with the two joined panels on breezy days. I went for a combination of metal eyelets and velcro to hold them in place and the lower stitched panels overlap inside the regular ones to stop smoke seeping through the gap.
Whilst I was putting eyelets strategically in everything I popped one in the top hole through which the finial screws to give it added strength. almost immediately afterwards I thought I should have cut a circular disc of spare material, placed it inside and pushed the eyelet through this too, just to give the top added durability.


The side material of the double panel under the apex was a bit flappy (see the lhs picture above) so I sewed the edges to the apex to increase rigidity. I three quarters unstitched both the single panels to help roll them back out the way if I was only using two panels. I reinforced the remaining stitching and placed velcro in the other corner to hold them in place if used to aid their rigidity. The panels would now be rolled sideways and secured to the poles, as opposed to being rolled up and secured.


Putting the flaps on in their near complete state meant that I could accurately measure how much space the grill would have to fit snugly between the legs and not touch the canvas sides. I used a rectangular one from a standard barbecue but I needed to cut a small section off both ends to both make it fit.


Which leads us nicely onto the fire grill. I've put a couple of pound shop non stick (or should that be 'non stick'?) pans together for increased strength and to help prevent potential buckling. I worked out three equal spacings around the rim(s) and simply used a small hammer to punch a bradawl through with minimal distortion. These were then fitted with split rings, had three small lengths of chain added which met in the middle and were secured with another split ring. This chain then goes through the grill and attachs to the grated clip in the capstan. Since doing the article I've taken some more advice from Derek and burnt off as much of the tin's surface just in case there was any risk of it contaminating the jerky.


I did two batches and used Cajun and jerk dry mixes with a little Seasonall mixed in. I used a charcoal lighter (which I've pimped to be a rudimentary stove) to start off some charcoal and a small lump of oak.
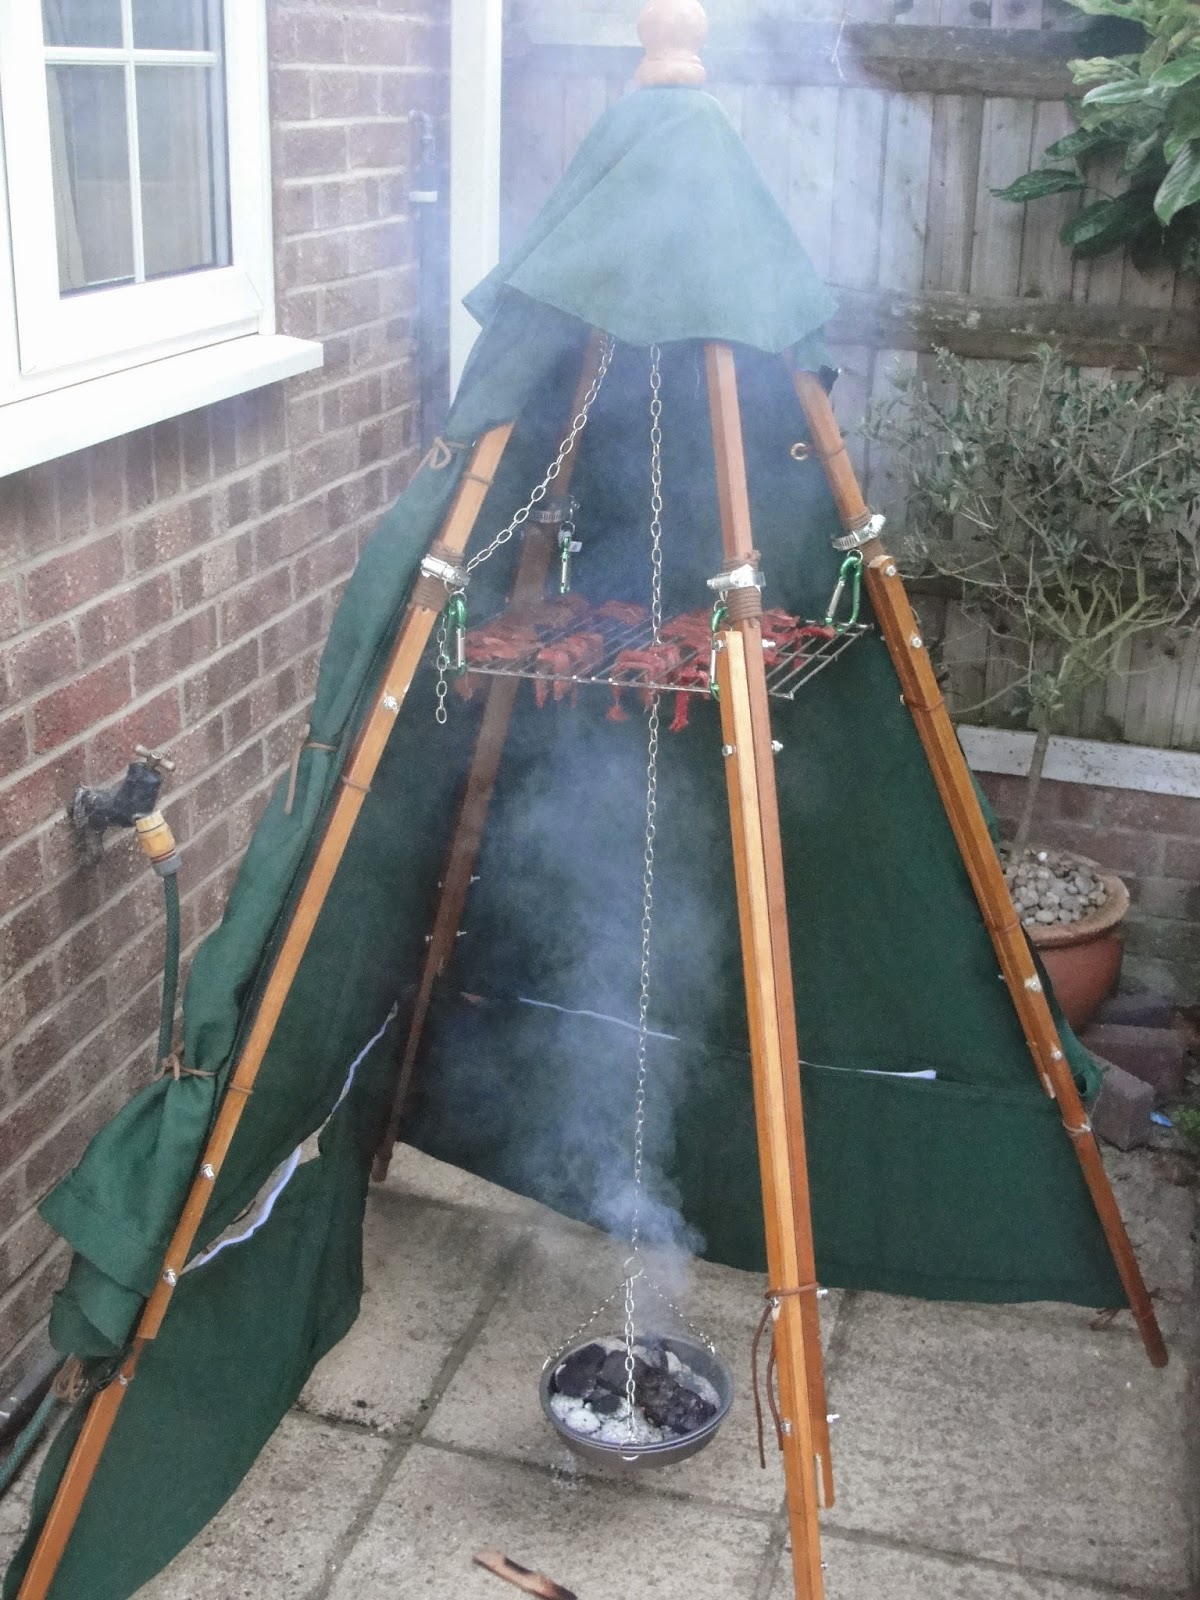

I transferred the charcoal and wood to the suspended pan. I've also included a shot of the grill which is handy in that the longer lengths can be half dangled, half draped, and any smaller lengths of meat can be simply placed on top. Any more than three supporting chains and you'll struggle to get the embers in.


The pan edge is handy because it can allow wood to be balanced on the edge, in this case plum, to allow it to burn a bit at a time. There is extra chain available so I may consider putting the extra just above the pan to allow me to anchor it to the rear leg (that I'm pointing at) to pull it in a bit if it's excessively breezy to help retain smoke. The other advantage of having a grill over skewers is that the meat can be moved around to maximise the sun available and minimise the effect of any shadow, layering from the front in a triangular shape looks like the optimum positioning.


My garden faces roughly East so the sun tracks along the side so as you can see from the lhs picture above I moved it around to maximise the sun's rays. It's portable if two people carry it carefully but you must do it slowly or the ember pan may leave you with a burn on your shin. The day's weather was sunny/ cloudy and breezy, you can see the wind is blowing the cover in the above lhs pic, and it was pretty wind resistant but I may look to fit prussic loops to the legs with a tent peg through each one so that I can peg it in (unless it's on a patio!).
It's turned out some quality jerky. This project very much reminds me of my attempt to make a pair of Joe O'Leary style moccasins in that it was as satisfying as it was absorbing, and definitely time consuming. I will probably look to replace the current bolted legs with ones made from continuous lengths of wood (and maybe stain them with birch bark oil, or is that putting flammability in the way of embers?) and maybe somehow make the legs adjustable for uneven ground? Maybe there's a some sort of metal 'thingy' I can get from a builders merchants to mimic the material pockets that secured the parasol spokes? Maybe.
One last thing re this project, stick on velcro is crap!
No comments:
Post a Comment