Showing posts with label Kaos blacksmiths. Show all posts

Saturday, 7 January 2017

First Attempt at a Tapered Tang Handle


So onto part two of my knife adventure which came about during my now finished work sabbatical when I had a slightly fortuitous 1-2-1 day with Ross Berry at Kaos blacksmiths in Kent during which I made a  full tang and this tapered tang knife blank to take home and handle. All well ans good but as I mentioned in the blog about the full tang handling it's something I have no experience of.


I left the tapered tang blank with it's black forge finish as I knew I wasn't going to mess it up with the finishing sand, as opposed to the full tang blank which I polished so I could sand the spine etc. I initially thought about a dark wood one piece handle but having seen the neck knives that Ross makes I thought I'd have a crack at a two part handle with some fancy Dan spacers. I chose some Birch for the smaller front piece and as I'd planned to have a central tang but ran out of time to sort it I decided to have a handle shape to accommodate and negate this. 

Ross often uses metal spacers about the size of a two pence coin but with the central tang I decided to have a larger sized spacer and sand it down as I wasn't sure how small I was going to get the handle. and I tried to make one out of an old bracket but I couldn't drill through it. . This was soon ditched as I didn't want any complications. I therefore ordered a bleached Water Buffalo bone spacer.


For the darker part of the handle I purchased a Walnut block which like the like the Birch part I measured, sawed, drilled and then roughly shaped. I did struggle with the holes as I don't have a pillar drill or any square edged rat tail files and whilst I did end up with a fairly snug fit the aperture where the blade meets the handle is a little larger than I'd have liked, for aesthetic reasons if nothing else.


So once I'd done all the groundwork I started looking at practicing putting the parts altogether which also includes some liners. I'd initially thought about a red liner between the bone spacer and the Walnut, and a black one with the Birch but then thought I'd have both either side of the bone.


And the moment of truth arrived to stop procrastinating and get gluing. I got (two part) glue all over the full tang scales as my fingers turned to bananas whilst gluing so I wrapped the wood in tape to help keep them clean. I also double wrapped the blade near the tang so that I could sand close without it affecting the blade.


I'm glad that I wrapped the wood as my gluing was again a little ham fisted and you can see a shine on the tape in the above picture. I turned my work bench on it's side, secured the blade and then used two clamps to put gentle pressure on the handle parts.


The process was successful and then to finish I had to get my head down and sand the handle to my satisfaction. At this stage the handle was a little square so I needed to round the corners a bit. I therefore marked the areas either side of the edges to give me sanding guidelines. 


I would have gone for a more rounded shape but my handheld sander was giving me a slow return so I worked through a couple of finer grit papers and called it a day. It is comfy enough to be used as an occasional around camp sort of  knife so extended usage won't be an issue. With my work bench back up the right way I again clamped the blade and applied a coat of boiled linseed oil which really does enhance the materials.


Two very satisfying blacksmithing projects in  differing ways. If you have some Christmas money kicking about give some thought to a blacksmithing day experience with Ross. Tantalisingly I have two spare spacers and enough Birch, Walnut and liner left for a Puukko style handle...

Suggested further reading:-

Kaos Blacksmith 1-2-1

First attempt at a full tang knife

Sunday, 4 December 2016

First Attempt at a Full Tang Handle


Well having made a drop point full tang knife blank on my recent Kaos  Blacksmith day (well lucked out 1-2-1) with Ross Berry which I'd never done before I now have to fit some scales to it...Which again I've never done before.


I decided to broadly replicate a knife I had made for me a few years ago and purchased some birch scales, black liners and brass loveless bolts. The scales were  basic ones (as opposed to top end) because I didn't trust myself not to make an unrecoverable mistake. I decided to get this journey down in words and pictures to both look back on, and to help anyone else attempting this skill. 


Firstly there were a few criss-cross marks left on the knife blank spine from it's former life as a steel blank,  and there were a few post hardening and tempering dark marks on the blade which would need sanding off and I did this first.


Then to the scales which I used a pillar drill that Ross had in his forge for accuracy. I drilled the pilot holes for the loveless threads  and then part drilled the larger holes to accomodate the fatter loveless bolts. With hindsight I would have drilled the larger holes a little deeper. Back  at home I fastened one scale on at a time, drew around the tang with a fattish marker pen and cut them out. I used a large line on purpose so that when I cut them out using a jigsaw I knew not to cross it to leave a little spare.


Once I'd got the basic scale sanding done (including making the internal face of one of them flush) I then cut out the liners, again with a little spare, roughed all the surfaces up and glued a scale to a liner using two part glue and clamps. I've seen many glues mentioned when researching this subject but I found a DIY store own brand one has left them gripping like you know what to a bear's fur. As well as the aesthetics of using liners I'm also told that they help as a useful material that bonds well to wood and metal.


So far so good but I but I was now at the stage where a full on sanding fest was both unavoidable and needed. Oh for a belt sander! I masked the cutting edge and sanded around the edges whilst they were roughly bolted onto the blank, worked on the edges whilst both unbolted from the blank and bolted liner to liner.


I kept checking and re-checking that both sides were level on a regular basis, as you can see here the right hand side needs a little more work. I used an orbital sander, sandpaper and wet and dry.


Once I'd got the scales/ liners close but no cigar to the shape of the blank I decided to fix them all together. I felt that I was at the stage where an over zealous burst of sanding would leave me thinking that I should have measured twice and sanded once. I roughly measured the depth of the scales against the loveless bolt length and decided to drill the whole way through as they were almost at that stage anyway. I has a run through and then committed to the same two part glue...And had a temporary banana fingers moment. 

I'd initially decided to go with two bolts and then at the eleventh hour gone for a third. I screwed one bolt in, unscrewed the thread, inserted the bolt on the other side and then screwed right through leaving the threaded part sticking proud both sides. Ironically I couldn't get the bolt all the way through on the extra middle bolt so I left the bolt sticking out some way, cut it off when dry and then threaded it in the other side and again cut it off.


So the post gluing report reads that the middle bolt is more decorative than the other two and that I got a small amount of adhesive on the scales. I'd imagined that I would so I was pleased that I'd not sanded closer before sticking the scales as I could sand it off. The only thing I wish I'd done was to leave the liners a little more flush at the front of the scale (where it meets the blade) as I realised that I couldn't really sand it any more without abrading the blade surface. They are close but it is a bit annoying.

I used a metal file at this stage to smooth down the cut threads and the top of the front bolts as they stuck up a little due to the front being a little thinner than the rest of the handle. After that it was a case of working through the grits again using a coarse sheet on the orbital sander, to medium sand paper to a quick tickle with fine 600 grit wet and dry until I couldn't catch my nail on the liners. The final sand with the scales on was the main reason that I didn't leave the blank with the natural forge finish on it as I would have sanded the tang shiny.

Oil 

I was then at the stage where I felt that I couldn't improve on the sanding job that I'd done and that it was time to apply a finishing coat of oil to the scales. I plumped for boiled linseed oil over Danish oil (cheaper and useful for applying to my garden furniture at a later date!).


Linseed has an unfortunate quality in that it can spontaneously combust if left in certain conditions on a rag, so once I'd wiped the knife over I burnt the clothes that I used to a) dispose of them and b) See how they burnt. I have to say that I expected the applied match to make them go 'Pfff' as they ignited but it didn't happen. However they did burnt steadily for some minutes and they seemed to burn in a similar fashion to charcloth, and being black probably added to this. The linseed oil made me think of the smell of putty into which it is added. If you are from a younger demographic you'll probably have to look it up, and whilst you are searching look up the joke about putty and toothpaste...


 Overall this has proved to be a very satisfying project, both making the blank with Ross and to finishing up with a usable knife. I've mentioned the odd  thing or two earlier but there are a few more that I wish I could sort; the handle is a tad too long which resulted in the scales finishing about a centimetre short of were I'd actually like them to. I'd like to have liked to have got a noticeable palm swell on the handle but equally it's tapered towards the front and is comfy, with hindsight I would have stuck a lanyard tube in and I wish I'd drilled just a little deeper when I had the pillar drill usage as a couple of the bolts are in holes that are just a smidge too flared. It's that situation where if I were to do another full tang knife that I would take on board all the minor learning points and probably make a much slicker job of it.


That all said they are only cosmetic, the knife is fully functional and rather handsome. Just the little tapered tang neck knife and  a couple of sheaths to make...

Sunday, 6 November 2016

Kaos Blacksmith Day


I first met Ross Berry at the  Wild Food and Chilli Fair on his Kaos Blacksmiths stand. I was soon to start my work sabbatical and was looking for activities to fill it with. Whilst chatting to his wife Sarah I was sold on the thought of attending a blacksmith experience day which would be a maximum of two customers. It was one of the first things I booked yet one of the last things I'll do on my time off.


One thing I was desperate to do was make a full tang knife blank so it was off to the Bushcraft Store to get some scales, liners and bolts (I was going to get a lanyard tube too but only remembered on the way home). I drew out what I hoped the blank would be like and once finished it wasn't a million miles away from a Bison Bushcraft Bushman's Pal and a Ben  Orford's Whittler and  Pixie knives.


I worked out my route and built in some spare time as I would be tackling the M25, the Dartford crossing and the M20. I used up a little of the buffer but as I got to within a handful of miles I encountered the extended delay known as the Wye train crossing-Goodness me! The reason I mention it is to be prepared if your route is ever similar to mine enroute to Ross. Also my SatNav stopped me a few hundred metres short of their place but as you drive on through the village the pub is easy to spot.

The Timber Batts public house is 15th century and the pair of them have taken a closed business and put their eclectic heart and soul into it. Look at the above right hand picture and you'll see timber beams and a dolly lamp and you'll see eclectic is spot on.


 Anyway I digress. I booked a November date as I thought it would be a good one to fill in the cooler autumn months, but as it happened I arrived in full sunshine which bathed the working area and yet the cool outside temperature would work well with the forge heat to create a comfortable working environment. Once I arrived I also discovered  that I was going to be the only one there at the eleventh hour so I am composing this blog from a 1-2-1 angle as opposed to a more standard two person day.


After having a cup of tea with Ross in the pub and saying a quick hello to his huge dogs we adjourned to the forge at the side. I'd run some ideas pass Ross of things I'd like to do and we did some bits out of sync as and when the moment presented itself so I'll cover the three things that I did in a rough order. First things first, a safety briefing and eye protection.


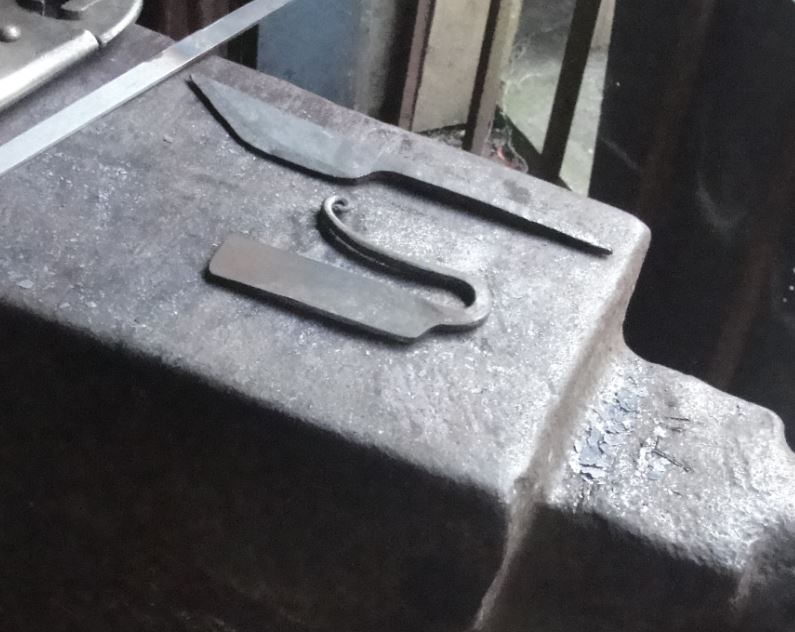
The first item that I made was a fire steel. I discussed various shapes and decided to try a Viking style one which looked a good introduction to metal bothering. The initial process was to create a long thin tapered length of metal which I started after some initial instruction.


Ross would then take me through the subsequent steps by working on his own piece and then I got on with mine. When I was in the groove he then did the next stage on his piece, which was actually a firesteel order for Jack Raven Bushcraft, with whom I did a medicinal plants day not so long ago.


Now the day before this attending this blacksmithing experience I'd been out and and about and made fire using a  bowdrill made from scratch in a wood and using a time lapse on my camera I'd chalked up over 1700 pictures over the two days. I've obviously discarded the vast majority but I did notice a lot of shots of us laughing and it's worth mentioning that if you want banter you've got someone who can revel in it all day.


And then finally I came to the nitty gritty; putting a curl on the end of the handle with a pair of pliers...


And then after the fine detail it was heated, bent and flattened to form the handle.


Until I ended up with a Viking fire steel, well once the unused stock at the end was ground off. It was good to go once the edge had been heat treated and plunged and I'm pleased to report that it chucks out a good amount of sparks.


We had paused after completing the fire steel for  lunch which Sarah had made (which was included as part of the day) and then after filling our faces we headed back. Now was you spend time in the forge you notice a lot of different things that Ross has made, as you do in the pub, and he produced such things as a bearded axe that he had made with Gransfors Bruks, and a piece of knapping that he had done and indeed a genuine piece too.


My second piece was to be a tapered tang neck knife blank. Again  tuition first and then onto my piece. I did make sure I knew what I was doing at all stages when using the forge if unsure because you only have a limited time to shape the metal until it cools.


There was a sort of deja vu with this as in many ways it was broadly similar in the initial construction to the fire steel with a tang replacing a handle that was worked to get it long and thin.


And that was two pieces produced and to be honest I was rather pleased with them. The neck knife just needed a grind and heat treating/ tempering to be finished which was done with my third and final project. It is worth noting that all of his anvils are in three figures age wise-It really made you stop and think how many different items were created on them over the years. The one pictured above was made during or just after Oliver Cromwell's reign.


Sometimes the proceedings had to be paused because clinker buildup was a constant issue and it needed removing on a regular basis since ignoring it sees the air available to the forge drop markedly.


Also as part of the day you get an afternoon beverage and cake pit stop, and when I say beverage and cake I'm talking Lavazza cafetiere coffee and a slice of homemade cake. 


And so to the thing that I wanted to make above all that I was making last! I've had an 01 steel full tang knife blank on my bucket list for ages and also wanted a smaller blade than the more 'standard' knives out there. I roughed out a basic blank on a piece of wood and Ross lined it up on a a 3 mm piece. My template was a few millimetres wider than the tool stock so we adapted it slightly to fit.


I then ground the waste off the blank and actually made it more ergonomic than my wooden stencil. The above picture is me grinding an edge onto the blank using an angled clamp. 


I'd actually ground the neck knife blank first and got Ross to just touch it up, but I'm pleased to say that the full tang one was all my own work. This is Ross showing me a little visual trick to check that the grind was on track.


By the time we did the heat  treating on the two knives we were losing the light as the clocks had just changed, but this is the voluminous amount of steam issuing from the oil bath.


We overran a little but I was so pleased to have completed three really nice and usable pieces. Perhaps the handle on the full tang is a little too long and I meant to do a central tang on the neck knife but what the heck I had a cracking day and can't recommend a day with Ross enough.