I have done a 'warts and all' bowdrill piece elsewhere on this blog but I decided to do a seperate page to just show the actual bowdrill technique. You can see the extended page here which covers everything from bowdrill set combinations to bow knots.
Firstly, you need to check the suitability of any wood you are considering using and this is a fairly good test to carry out. See if you can mark the wood by gently rubbing the end of your thumbnail from side-to-side.

The picture above is demonstrating the starting of the baseboard depression that the drill will sit in. I've got the board under the ball of my foot and just over a couple of centimetres or so in from the edge of the board (you can offer the drill tip up to the board to get a good idea of positioning), insert a sharp knife at an angle and carefully and slowly spin it round to form a depression that mirrors the bottom of the drill. If the two shapes are vastly different you'll get an area that doesn't char later due to lack of contact. This lime is really softwood so it would be possible to sharpen the drill tip to a steeper point and start off with an initial pilot hole made with the knife tip.
Jason showed me this method of making the depression and I prefer it to holding the block and doing it. Back in the summer of 2011 I did a bowdrill article for a magazine and, without boring you with the how and why there was a picture that accidentally got published that didn't show the best technique. I clarified it in the next issue but felt a bit scapegoated at the time so it's almost cathartic to put the above image in.


Next the drill needs loading into the bow string. Hold the cordage near the middle in one hand, the drill diagonally in the other underneath the cordage. With a firm anti (counter) clockwise movement turn the drill over the back of your other hand and the cordage will start to wrap around the drill, it will be the opposite way round of course if you are left handed. It should be tight and go with a 'dunk' sound.

You should now have the drill engaged in the cordage outside the arc of the bow as this will allow for the longest possible strokes. Whilst the drill is in this position try and slide (not roll) it up and down the cordage, if it moves easily then your bow string isn't taught enough and you can find that when bowing the cordage moves but the drill doesn't if it isn't taut. If it is tight enough and you haven't got the strength to engage the drill like this then try placing one end of the bow on your hip, place the hand that was holding the cordage on the other end and gently push to flex the bow which should allow you the temporary slack to do it. However you get it in hold it tight! It surprised me just how tight it needs to be when I started out.

Stand on the board with the ball of the foot, not the arch. Note the position and angle of the rear leg, my knee is in line with my left leg and is at an angle which forms a roughly triangular shape which not only gets the trailing leg out of the way of the drill but also gives a stable platform to drill too. Note the doubled up limpet shells on the board ready to be used.
Now with tinder sorted, drill in the bow, limpet bearing block and baseboard in place, trailing leg angled, arm hooked around the leading knee and torso over the kit it's show time. Some folk position their foot right up close to the drill, I'm happy to be an inch or away. When using limpets as a bearing block (use two for strength or they'll break at the apex of the shell) I taper the pointed end of the drill to try and match the shell's inner angle.

When I initially taught myself I was almost battling the wood to give me fire and went off like a nutter when bowing but there's no need to. This stage is to properly marry up the depression and the drill for maximum contact and in this instance to char both surfaces as the board and drill were previously unused. You should aim for steady, regular strokes which maximise the bow's length and with enough pressure to keep the drill in place. Look at not only the depression to see what's happening but also at the string around the drill and bow to check that the bow is doing strokes parallel to the ground (I still find that I have a habit of letting the bow rise on the forward stroke every now and then).
Don't be surprised if the drill suddenly shoots off at any stage of drilling because if you tilt the drill/ bearing block from a vertical/ horizontal position or don't apply enough pressure then it may well happen and yes, it still happens to me. It can also occur if your drill isn't straight so you may need to carve it to correct this issue.
If your set is viable you should get wisps of smoke fairly quickly and once it's had, say, 10-15 seconds smoking you have probably done enough to stop. When I stop I reach my fingers and them down from the bearing block, hold the drill and lift the set up so if I think the depression could do with a little more bedding in I'm good to go again. There is a picture of the drill being lifted later on.


If the ground isn't too hard I stick the top of the drill into the ground when not using it as this keeps the business end from the ground, and it may help to prevent charring in the bearing block. Note that the drill tip is now rounded. I was happy with this depression as it is a centimetre or so from the edge and uniformly dark in colour. If there is a lighter part (often the centre) it suggests that the drill and depression shapes weren't well married and if I have that happen I usually re-shape the drill and bow it again for a short period. you'll notice a Swiss Army knife in the right hand side picture above being measured against a folding saw, more on this later...
Now to the bit I like least, cutting the notch.
This is the part that I find really easy to make a mistake on and the fails are usually not cutting a notch of the right size, cutting it too big or the apex isn't pointed. Now you can slowly cut the notch with a sharp knife, saw or a combination of both which is what I do. I use both the fixed blade and Swiss Army knife at this stage and I'm marking a central line with the latter down the middle of the depression to the edge for guidance.

I then flip the board on it's side and mark again. In and earlier picture were I'm holding a Swiss army knife saw blade alongside a regular folding saw well that's to show that whilst they are of a similar width, the folder is a shorter blade and has smaller, closer teeth which I prefer for cutting the first part of the notch. You are aiming to cut a one eighth 'cake slice' out of the baseboard to the centre of the depression and I start by making a central cut to about the edge of the depression, then I do two angled ones to the same depth using the central one as a guide.

This cut portion should snap out when you gently bend it side-to-side and look like the above picture, and once the piece was removed I noticed that one of the cut angles was a bit too wide (on the left of the picture). This to me is the greatest advantage of removing the notch in two stages because using a saw removes bulk in a timely fashion but only doing part of it allows me to rectify the angle if needs be. The biggest notch I've ever accidentally cut was a quarter and whilst I got close to an ember it didn't generate enough powder and the drill kept shooting out as it was unstable anyway. Make it appreciably too small however and the powder can't collect.
I then finish off the apex of the 'pie slice' with careful and controlled carving using a sharp knife. I'm not telling anyone how to suck eggs by saying sharp, rather it makes the cutting easier than using a dull one.
This clearly shows the change of notch angle once the knife was engaged. The 'pie slice' is not quite centre by the smallest of margins but I've decided to leave it as it is because whilst it will achieve an ember it will generate a sign later on.
Another reason for only using a saw halfway is that if one saw cut goes just past the centre you'll still stand a chance of getting an ember but the drill will often develop a 'nipple' in the centre of the drill as the wood is forced through the hole and doesn't wear down like that around it. I've included a pictorial reference later on.
I've also flared the two edges of the notch on the underside. Jason showed me this to help in inclement weather and JP slopes the whole of the notch to allow easy collection of the charred dust so I'v added it in to my procedure, One last thing to check is that the sides are carved as smooth as possible otherwise the char can get caught on any rough areas and hinder the ember development.

The ember pan is simply a dry piece of bark or a sliver of wood and shouldn't be too thick, in this case I'm using a lime one saved from when I carved the base. I am about to place the baseboard on it to catch the soon-to-be generated dust. Make sure it is longer and wider than the notch. I've read that birch doesn't make a good ember pan which I assume relates to it's tendency to curl up when heated (it needs folding if used as a splint). With it's flammable oils I've often wondered about using a scraped piece of silver birch just to see if it would catch fire with an ember on it. Another note to self...

Just before I start drilling I gently score the bottom of the drill a couple of times by placing the knife blade on top and rocking it back and forth. It doesn't need to be deep but it just adds a bit of bite when the bowing starts. I used to add dry grit to the depression as an abrasive but quickly stopped as my technique improved and it's not always easy to find bone dry grit out and about anyway. You'll know and feel when a set is working smoothly but scoring the end can, on occasion, cause a little temporary squeaking...I'm really pleased that when talking to an established bushcraft instructor about bow drilling once he was magnanimous enough to say he'd didn't know this. Note that the thumb from the knife hand is steadied on the drill, and the thumb from the other hand is on top of the blade for both safety and close control.

Again start with controlled strokes using the length of the bow cordage and you should start to see a whiff of smoke after a few seconds. Keep going and the smoke will become regular and at this stage I usually speed up a little. When it starts issuing to the point where it's twirling up the bottom of the drill apply some controlled downward pressure and keep bowing for say, a count of ten and stop. If you find that the cordage isn't tight enough at any stage of bowing you can reach down with the index and middle fingers of your bowing hand to grip the cordage and gently squeeze to get it tighter.
Now I mentioned earlier about lifting the set up in one go, again it is useful at this stage because if you don't see smoke coming from the notch once you've stopped you can quickly get the drill in position and get going again.
The small whiff of sustained smoke and dark dust colour tells me that the ember is viable. Notice the powder around the rim? Well I posted a similar picture on Facebook a while ago and a well respected bushcraft instructor suggested this dust around the depression is possibly because the notch is ever so slightly short of the depression centre as mentioned earlier and the dust gets pushed up the depression sides instead of into the notch. That said, there are similar images in some of the website how to's that I used so the jury is out on that.
As you can see, the hot dust can collect in volume within the notch and if you cut it too close or even on the edge you'll have a job on your hands. angling the drill may help but it's not easy to sustain. I'd suggest cutting your losses and starting a new depression.
Here I've used a length of dried grass from the 'straight' tinder bundle to gently tease the developing ember out. Hold the board and gently insert the grass into the apex of the notch at about 45 degrees with the other hand. very gently pull the ember away with the grass whilst equally gently moving the board away in a slightly tilted motion (see the above picture). You can actually see that the ember is roughly triangular. As well as a length of dried grass you could also consider using a thin twig, a leaf stalk, feather quill or Swiss army knife tool to help tease the ember out.
The left hand side picture above clearly shows smoke, the developing ember and some of the initial lighter brown dust, I sometimes put a little of the light brown dust on the ember if it is on the small side to help it but don't smother it with loads. Now out of the notch this ember is very vulnerable and needs protection, think of the male drill and the female board creating a baby that needs nurturing.
It needs to reach a temperature of 130 degrees centigrade as it coalesces from an ember into a coal and it should be kept out of any breeze and if the ground is wet it would be advisable to carefully lift it up and away from any potential moisture issues whilst cupping your free hand around the edge of the ember pan.The above right hand side picture above is of me gently wafting the air above the ember to get oxygen into it (don't blow it at this stage as it's too delicate). You should see it glow orange when you do.
Almost there but equally, this is a stage were you can, quite literally, snuff out all of your hard work. Bear Grylls is much maligned but he has a spot on analogy for this stage. Treat the ember as a butterfly that you've caught in your hands; squeeze too hard and you'll kill it, don't hold it securely and it'll get away and I'd be surprised if both haven't happened to anyone trying.
I stick my thumb in the pocket I made to help hold it open and clear and offer up the now grey and fully formed coal to the top of the bundle, I then angle the bundle slightly and gently tip the coal in and sometimes it will need a gentle tap on the ember pan with your index finger. If you are using an extender as previously mentioned like a piece of crampball (or even charcloth) try and land the coal near this if at all possible. Personally I don't always use extenders because they won't always be available.


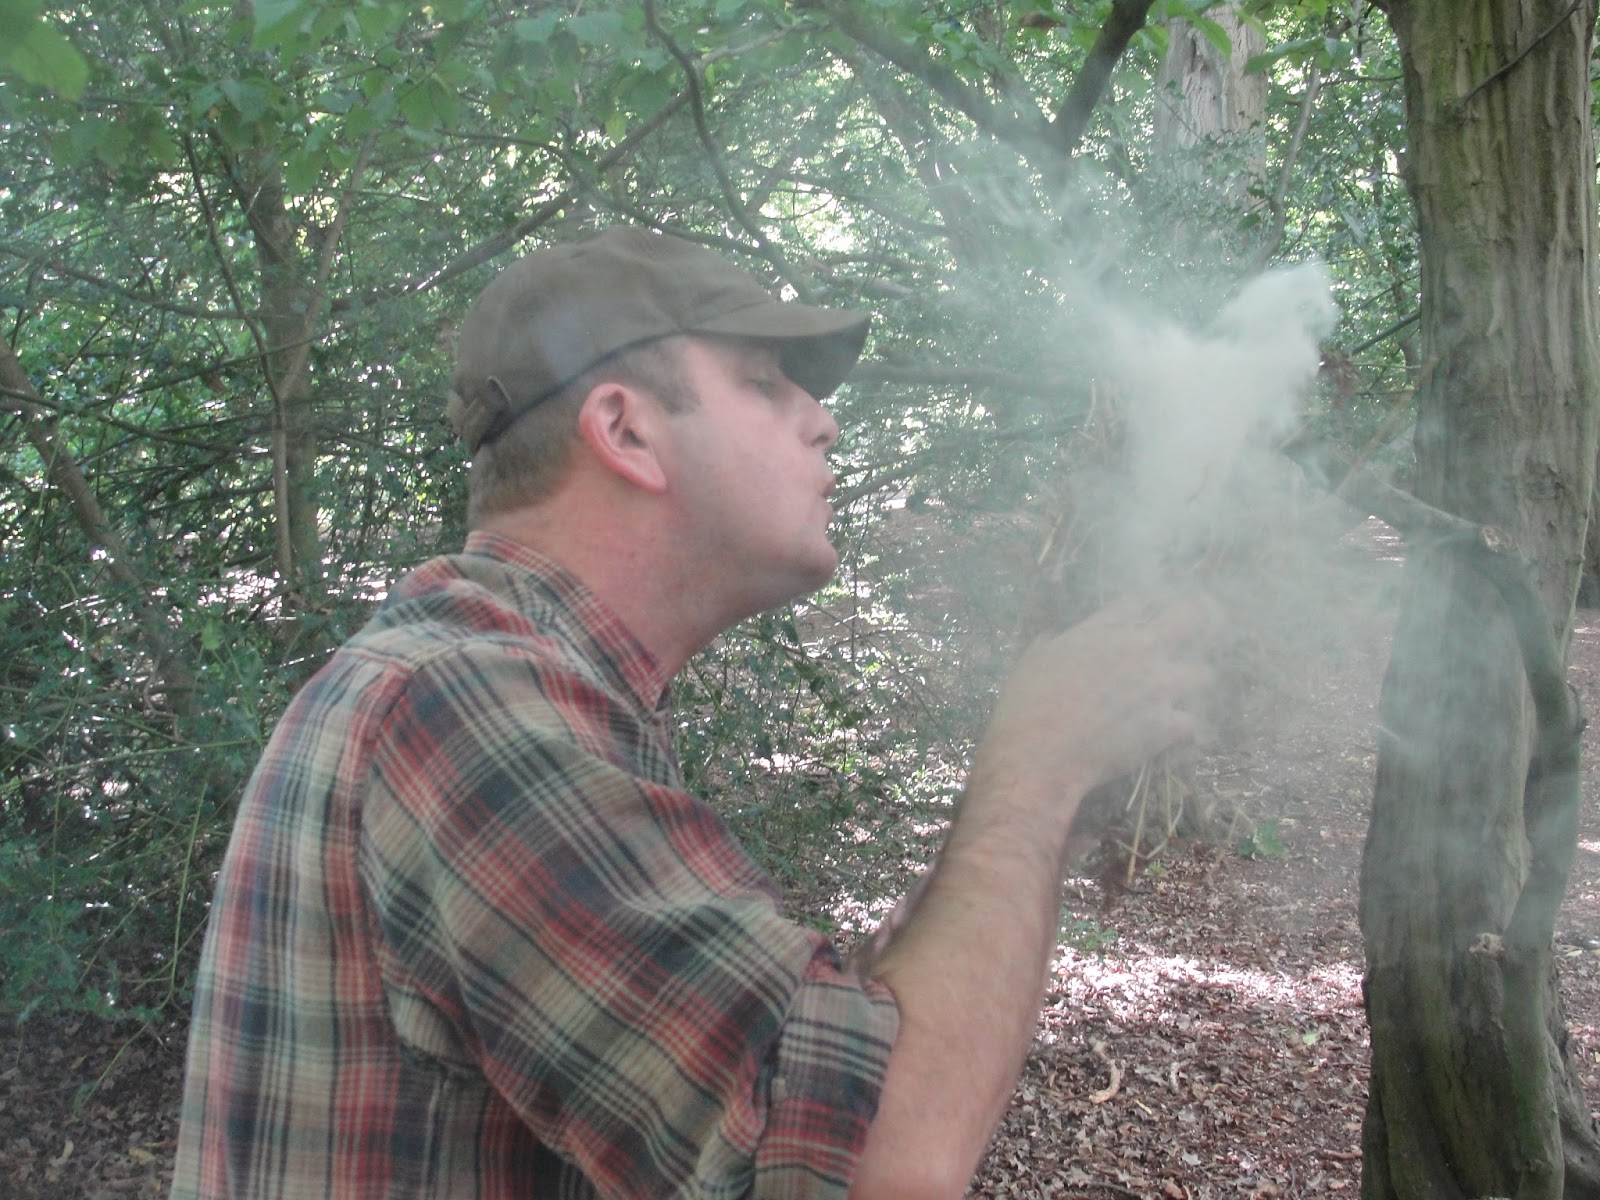
You then gently push the pocket to a slightly closed position which allows the coal to get oxygen from you, secures it and puts sufficient material in close contact with it to work on. If there is a breeze align it over your shoulder from behind. Make sure that your breaths are good steady ones similar to blowing a candle out, as opposed to a quick one like if you are blowing a fly off your arm. Don't blow too close to the bundle because you can potentially introduce moisture from your breath. Also, any fresh matter in your bundle can generate steam when it gets hot.
When you need to take a breath pull your head back slightly and the extend the bundle forwards which allows air to get in via the movement but also allows you a smoke free lung full of air. Some folk make the bundle movement a quick and large arc whilst drawing breath but I personally don't do this.
Smoke will slowly get more voluminous and eventually go a sort of 'smooth' creamy colour and consistency (this is apparently when the gasses are about to ignite) and á voila. If you are using it to light a fire invert the bundle to allow the flames to work on the bulk and remember to do it near your fuel.