My Sulphur Match Youtube video
Sulphur matches (also called spunks) are an old way of lighting fires via an ember source and are easy to make. I needed to make some more but I'd used up the sulphur in my eldest's chemistry set so I've had to purchase some more. You really don't need a lot to make loads of matches and I used this company to buy a 100g bag and it was called flowers of sulphur.
The matches work by the ember source heating the sulphur which bubbles and heats up until the wood it is on ignites. I decided to try a few experimental variations by using some iron filings (again out of my eldest's chemistry set) and some scraped magnesium from an old ferro rod block.
I also made various test splints with small carved reservoirs (the ones on the left) and 'featherstick' ones (on the right). They are the wooden stirrers that you get with a coffee purchase which I've collected. Both these experimental and the standard splints need either a point or wedge shape end adding to them before being made into matches.
The sulphur needs very little heat to melt and so a cut down and upturned drinks can and a night light is all that's needed. All I've done is to cut a small curved section out so that I can keep an eye on the flame (to see that it hasn't blown out) and also be able to hook the night light out if needs be.
So this is just under two teaspoons of sulphur powder placed in the concave 'bowl' and the night light lit and placed underneath. at this stage it is worth mentioning that you must do this in a well ventilated area because you will create sulphur dioxide so don't breath it in. Added to that I also wore goggles too.
Once it's melted dip the cut end into the liquid sulphur and make sure that the end is thoroughly coated and set aside on a raised area to dry, I used two lengths of wood. The sulphur will dry a yellow to amber colour depending on how warm it is, this can could have been cut a shade higher as they were a little darker than the 'classic' coloured ones. Depending where you will keep your matches out and about you can either make small single ended, or longer double ended ones.
After making a load of standard matches I put a little more powder in the bowl and turned to the experimentation. I started by going through the standard coating process then sprinkling magnesium and iron filings on the still wet sulphur, both singularly and combined.
I rolled up a Himalayan Birch (Betula utilis) splint, this is the papery bark version that gets planted on streets and in parks and has volatile oils of it's own.
And a slow match I have which works in the same way as a sulphur match but instead of combusting it glows.
And finally the experimental featherstick/ 'reservoir' ones.
I left them to dry on a split piece of Lime. Note the clothes peg holding the Silver Birch one closed until the Sulphur sets and holds it.
From left to right: Featherstick magnesium, iron filings, Silver Birch, mixed magnesium and iron filings and a standard one.
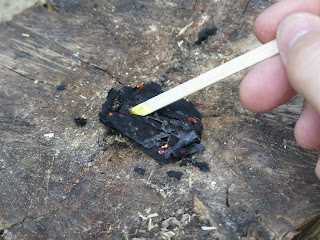
So as previously mentioned for a sulphur match to light it needs holding against a heat source, in this case charcloth.
You'll slowly see the sulphur go darker and bubble.
And darker still.
Until it flames up.

The Birch one stayed rolled once the sulphur had set, caught fire quickly but almost predictably it consumed the splint quick quickly due to the bark's own pyrotechnic credentials.
This is the magnesium one next to a glowing Cramp Ball fungus. You can see the odd magnesium spark but whilst it lit it didn't really spring into life like a thought it would
The iron filings were a last minute idea and again, like the magnesium, worked but didn't really do much more. The one dud was the slow match which didn't light.
Conclusion, the originals can't be beaten!


No comments:
Post a Comment