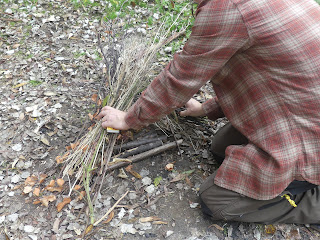
We have a district cub skills camp every September and one of the bases is fire lighting. The first time I had this as a base to judge the first group literally made a pile of big logs, placed a few thinner pieces on top and then proceeded to drop inch long twiggy lengths onto the weak flame that, of course, soon perished.
This attempted fire lighting has always stayed with me so whilst on a weekender at the new Lee Valley Almost Wild Camp I felt the urge to get my camera set up on timer mode and knock up a how to for when I do fire lighting with the Cubs.
Prepare the site of the fire by scraping away any leaves and other detritus to bare earth. Don't have a fire near a tree, on peaty ground or pine needles and the like.
Lay down a parallel series of dry wood lengths in the place where the fire is to be lit. This keeps the kindling away from ground moisture and the small gaps between the wood allow the yet to establish fire to draw air up.
The kindling l have gathered is a mix of easily sourced Birch and Pine branches (the former has flammable oil in, the latter equally combustable sap), some dried lengths of Jack-by-the-Hedge and Cleavers which are all excellent additions. The kindling needs to be as dry and thin as possible, something that makes Birch very suitable.
If you are gathering material in wetter weather it does prevent more of a challenge. Wood if split can be, often than not, dry in the middle and there's often fairly dry wood to be had in the form of dead fallen wood wedged in branches that have broken it's fall. Wood straight from the floor will be pretty damp. For tinder seed heads, such as Rosebay Willowherb (above) is worth looking out for in any weather, as is Silver Birch bark which contains a volatile waterproofing oil.
Birch can be a bit splayed in nature but it can be aligned somewhat by twisting it with the same wringing action that you would apply to a wet dishcloth to help it lay flat.
Keep looking for suitable fuel until you've gathered enough to form two good bundles between thumb and finger to about the diameter of a soup can (I find this is sufficient for my needs). I then placed the right hand said bundle across the wooden base diagonally, with the left hand side one then placed diagonally across the first bundle and make sure that any wind is blowing on your back which includes keeping your knees together to prevent any wind blowing under your backside. I have a very sheltered spot for this particular lighting and there is next to no wind in this area.
When collecting the Birch I also collected some peeling bark which, as previously mentioned, is an excellent fire lighting medium which I place in the centre of the kindling bundles.
Bend forward slightly and strike your match close to the centre of the kindling 'tipi'. Let the match flame become established.
Just on the striking of the match...It should never be held in the middle as it is all too easy to snap, rather the support should be right up to the head. A lot of outdoor folk strike the match downwards and then cup it with the hand holding the box to give the flame wind protection. When striking a match support the head with a finger close to the head. You can see Ray Mears strike a match forwards in this video from 2:55.
I prefer to do it the other way. Still supporting the match along it's whole length I flick it upwards as opposed to dragging it.
As the flame establishes close to the matchbox the opposite hand can then be brought round smartly to protect the embryonic flame. I just find that I can cup the match head quicker this way than the other.
Apply the flame to the Birch, or kindling if you haven't got any bark. Don't push the flame too close to the fuel or there's a risk it will be extinguished, another trick Cubs tend to do.
Once you know that the fuel is alight, move the match to another spot, and then another until the match is all but consumed.
Note on the right hand side of the picture that I'm stowing my matches safely away now that the flames are sustaining. Putting them on the ground could lead to them getting damaged, lost or damp.
The reason that longer lengths are advantageous are that you can safely pick the bundles up at the ends and then lift and/ or reposition the fuel to maximise the the airflow and indeed to allow more fuel to be exposed to the flames. This perfectly demonstrates the fire triangle of fuel, heat and air needed to be successful.
The seasoned wood that l need is stored in size order from small to large. It was a damp day so l placed it on two lengths of wood to lift it off the ground.
Dinner is on.


No comments:
Post a Comment