Sunday, 25 February 2018

Lighting a Fire With One Match


We have a district cub skills camp every September and one of the bases is fire lighting. The first time I had this as a base to judge the first group literally made a pile of big logs, placed a few thinner pieces on top and then proceeded to drop inch long twiggy lengths onto the weak flame that, of course, soon perished.

This  attempted fire lighting has always stayed with me so whilst on a weekender at the new Lee Valley Almost Wild Camp I felt the urge to get my camera set up on timer mode and knock up a how to for when I do fire lighting with the Cubs.


Prepare the site of the fire by scraping away any leaves and other detritus to bare earth. Don't have a fire near a tree, on peaty ground or pine needles and the like.


Lay down a parallel series of dry wood lengths in the place where the fire is to be lit. This keeps the kindling away from ground moisture and the small gaps between the wood allow the yet to establish fire to draw air up.


The kindling l have gathered is a mix of easily sourced Birch and Pine branches (the former has flammable oil in, the latter equally combustable sap), some dried lengths of Jack-by-the-Hedge and Cleavers which are all excellent additions. The kindling needs to be as dry and thin as possible, something that makes Birch very suitable.


If you are gathering material in wetter weather it does prevent more of a challenge. Wood if split can be, often than not, dry in the middle and there's often fairly dry wood to be had in the form of dead fallen wood wedged in branches that have broken it's fall. Wood straight from the floor will be pretty damp. For tinder seed heads, such as Rosebay Willowherb (above) is worth looking out for in any weather, as is Silver Birch bark which contains a volatile waterproofing oil. 


Birch can be a bit splayed in nature but it can be aligned somewhat by twisting it  with the same wringing action that you would apply to a wet dishcloth to help it lay flat.


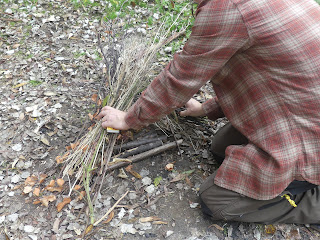
Keep looking for suitable fuel until you've gathered enough to form two good bundles between thumb and finger to about the diameter of a soup can (I find this is sufficient for my needs). I then placed the right hand said bundle across the wooden base diagonally, with the left hand side one then placed diagonally across the first bundle and make sure that any wind is blowing on your back which includes keeping your knees together to prevent any wind blowing under your backside. I have a very sheltered spot for this particular lighting and there is next to no wind in this area. 


When collecting the Birch I also collected some peeling bark which, as previously mentioned, is an excellent fire lighting medium which I place in the centre of the kindling bundles.


Bend forward slightly and strike your match close to the centre of the kindling 'tipi'. Let the match flame become established.


Just on the striking of the match...It should never be held in the middle as it is all too easy to snap, rather the support should be right up to the head. A lot of outdoor folk strike the match downwards and then cup it with the hand holding the box to give the flame wind protection. When striking a match support the head with a finger close to the head. You can see Ray Mears strike a match forwards in this video from 2:55.


I prefer to do it the other way. Still supporting the match along it's whole length I flick it upwards as opposed to dragging it.


As the flame establishes close to the matchbox the opposite hand can then be brought round smartly to protect the embryonic flame. I just find that I can cup the match head quicker this way than the other.


Apply the flame to the Birch, or kindling if you haven't got any bark. Don't push the flame too close to the fuel or there's a risk it will be extinguished, another trick Cubs tend to do.


Once you know that the fuel is alight, move the match to another spot, and then another until the match is all but consumed.


Note on the right hand side of the picture that I'm stowing my matches safely away now that the flames are sustaining. Putting them on the ground  could lead to them getting damaged, lost or damp.


The reason that longer lengths are advantageous are that you can safely pick the bundles up at the ends and then lift and/ or reposition the fuel to maximise the the airflow and indeed to allow more fuel to be exposed to the flames. This perfectly demonstrates the fire triangle of fuel, heat and air needed to be successful.


The seasoned wood that l need is stored in size order from small to large. It was a damp day so l placed it on two lengths of wood to lift it off the ground.


Dinner is on.


Thursday, 15 February 2018

Wood Steamer


During a paid work sabbatical that I had in 2016 I did half a dozen afternoon courses at World of Bushcraft's now closed Bedford centre and for the  Christmas wreath making session (predictably in December) a wallpaper stripper powered wood steamer was used to shape the Hazel frame.

I vowed to make myself one at some stage in the future because there are several projects in Bushcraft and Survival Skills magazine that I fancied having a crack at. I recently took home some waste wood from work and the building commenced.


I started by tidying up the wood as there were pieces of cut down cross beams still nailed on that needed removing. Once done I levelled up the pieces at one end and proceeded to screw together a base and two sides.


The World of Bushcraft one was about 6" x 6" but my one was going to have a lot smaller internal diameter but for my needs it will be fine.


I decided not to screw the lid on between the two sides as the minimalist interior may well have been just a little too small, so I nailed two pieces of glass beading (the wood that holds glass in doors) along the edge so that the top fits on like a lid. I left the beading shy of each end to fit the two ends on.


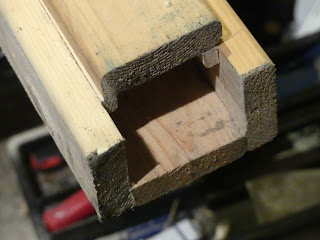
This is the fixed end which I simply screwed in. I expected this low grade wood to leak steam from somewhere when I'd finished but if not I would retrospectively drill some steam vents in this end. The lid will be screwed on flush to the edge.


I looked at putting some beading along the base to raise the wood up and therefore come into more contact with the steam but as previously mentioned the internal space was at a premium. If I ever build a larger mk II I would consider this. The lid was secured by screwing it into the beading.


This is the opposite to the fixed end and is going to be both hinged and the entry point for the steam. Note that the lid finishes short of the edge to accommodate it. 


And this is the hinged lid before being secured. I initially had plans to use a small section of plastic conduit but it turned out to be a little too small. This blue fixing is the middle from a roll of packing string and it turned out to be absolutely perfect. I'd intended for most of the blue fixing to be internal but with it drilled into the middle it caught on the frame as the door opened so I had to push most of it externally. As with the world of Bushcraft model mine was to be powered by a wallpaper stripper too.


So that was the steamer built and ready to go. I have a path in my back garden that is sloped to help the steam travel up the end so I decided not to put any stands on it to drain water. I did however place it on the beading off cuts on it's first outing to see where the water drained from. I sourced a fairly bendy length of Hazel for the test run.


I fired up the wallpaper stripper and watched for steam escaping. There was some seepage at the far end through the gap between the beading and the side. It wasn't a lot so I thought steady as we go. The water was running out under the door so it won't need any drip holes drilling. I left it running for around an hour which is the rough rule of thumb per inch of thickness of the wood being steamed.


And out it came, hot and freshly steamed. I straightened the kinks out along it's length and then set about bending the length bit by bit. I was aware of the time I'd spent straightening it so I was careful not to kink it when bending as it cooled off. 


Despite this being a test I was fairly pleased with the result. Not only is the steamer functioning but I have a project in mind for this test piece. It'll need trimming up a little further down the line but that's another day.


Snagging.

If I do nothing more to the steamer's structure it will work just fine. here was a little warping in a couple of small sections of the beading. I guess I  can  use some sealant, put in some extra nails or just leave it.

It occurred to me just before I removed the Hazel that the blue pipe fixing will need to be cut or over a step as it's too long to allow the door to open out flat. I can either live with it, cut the fixing down (but perhaps have issues with the pipe staying in) or cut another door and have the steam hole in the side.


Bottle Fish/ Crab Trap


When my two boys were growing up we took many trips out armed with a simple but effective fish bottle trap and indeed it was one of the first articles I did for the now defunct Cub Supplement (April/ May 2011) which used to come with Scouting magazine. The most easily deceived freshwater fish is the humble Minnow. In my experience the two best size bottles are the 2 and 5 litre clear ones. Start by removing any labelling on them.


The next stage is to carefully cut the top of the bottle off at the point where it starts to curve up towards the lid. I find putting the lid on, gently squeezing with the holding hand gives sufficient rigidity to use a bread knife to make a cut of a few inches.


I then use scissors to finish the remaining cutting as it's easier to finish with a straight and clean cutting action.


Once the cutting is complete you will end up with the bottle in 2 pieces as shown above.


The larger bottles will have a handle that will need removing, normally this is possible by bending it back and forth until the plastic fatigues.


The reason that the bottle is cut where it starts to taper is that the top needs to be turned  backwards into the larger section (above) and therefore needs to be a snug fit.


With the two parts in situ use a hot skewer (warmed in a flame) to punch four holes through both (where they overlap) equally spaced. This is made easier when the bottles have a square shape to them like the example.

It almost goes without saying that the skewer will get hot and I warmed the one used here on a gas hob ring.


I then use simple food bag ties to secure the two sections together. The advantage with these ties are that when releasing whatever you've caught and  changing the bait  both are easier.


And here is a shot of the trap with three of the four ties in place. So easy are these to make that this one was made on a family holiday.


You will, of course, need to add some weight to the fish trap and the obvious inclusion is a few stones. I've tended to come away from using stones as I was concerned about damaging anything I caught so I made a 'mat' of metal rods that sits in the base, large fishing weights on a string also work well.


As stated earlier Minnows are so gullible to the point where they seem to accept their lot, even to the point of continuing to eat the bait whilst incarcerated! Some species, such as Perch, seem maddened and try their best to get out inn fact there's a picture of them in the Cub supplement link mentioned earlier.


I've had various species show an interest in the trap with this circled Crayfish being interested in plain bread, and an Eel squeezing in during a holiday usage of the trap. A larger bottle would have seen him go all the way in but his long length meant he didn't have to sadly.


Actually I made the standard fish trap just to get the necessary pictures as it was actually a seaside vacation and this bottle trap was going in the briny. the modifications are as follows: start by cutting the threaded bit of the neck off where it joins the main part of the tapered bit.


Then make several cuts at 90 degrees all the way around the hole, just over an inch in length. Once done splay them out slightly. This gives an aperture that  larger crabs can get in.


And as with the standard trap the top part gets put in the main part reversed and secured.


The 5 litre bottle makes quite an ample sized trap.


One modification I've made for harbour fishing is to cut a hole in the middle of the bottle with splayed edges to give any beasties that are lurking in the gaps a chance to enter as the trap is pressed up against the stonework.


Both versions will need some sort of cordage tying to it to make it retrievable with paracord and crab lines being obvious choices. The former is more comfortable to haul a full pot up but the latter has a lot of length in a small area. With a sea version I also put on a small bright object (which in this case is off a flat fish lure) so it can be seen in the murky depths.


And here is the finished trap with the cordage tied fore and aft. I had some paracord with me so I wrapped a little around the bottom of the removable top to give a little purchase for any crabs. Kitchen string also works.


Another useful addition to the weight is a small bait box. It secures the bait at the rear and if you are using bits of meat it means that it's kept in one place and therefore makes cleaning easier.


This is the one time you can throw a plastic bottle in the sea with no guilt attached!