Thursday, 26 October 2017

DIY Campfire Toasting Fork


My Youtube 'how to' Video

When you have a camp fire and toasted food is the order of the day sometimes a sharpened stick simply won't do. A toasting fork is a fairly easy project  to make out of a length of wire about 2-3 mm in diameter, something like a coat hanger an old fishing net or non-galvanised fencing wire (don't use galvanised metal is there is the chance it will give off zinc oxide fumes when heated . A detailed occupational health document on zinc oxide fumes can be found here). 

This fork is mounted on a suitably sized stick to keep your hand a safe distance from the embers. Did you know that a broomstick diameter is considered the standard stick size for the Official Toasting Fork Club's UK branch*? 


I've got my usual coat hanger with seconds to live, plus I thought I'd try with a slightly larger diameter fishing net too. I think it's safe to take it apart as I can't see my teenage kids wanting to fish with it any time soon.  The tools tools you will  need are pliers/ hacksaws and maybe a file to smooth off rough cut edges.


Coat hangers are fairly biddable so usually pliers and a broom handle will suffice but you could always use a small saw. Start by removing the coat hanger hook. an average coat hanger will give you about  84 cms or 33 inches in old money to play with which give you a small amount of trimmable excess if the 'prongs' on the  finished fork need evening up


Once de-hooked give the metal a rudimentary straighten with your hands.

.

Then, using pliers, refine the straightening.


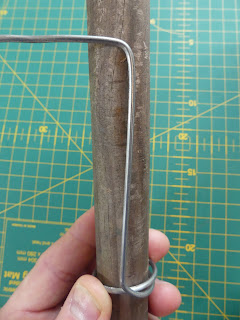
Find the centre and then, using your broom pole twist the metal as shown, initially using pliers until it forms a fairly snug circle. I've got this pole propped up against the side of a table with it secured between my knees.


Then carefully bend the lengths through another 90 degrees as shown.


Pliers time again. Start bending one of the lengths into an upright position 


Try and keep the start of the bend as central as you can but equally it's not a problem if it isn't mathematically spot on.


You should then have a metal structure not unlike this for your efforts. It is a project that will need the odd tweak as you go along, so after getting to this stage I gave the two lengths a quick re-shaping to make them more parallel. 


The next stage ruins the landscape series of pictures but is necessary to show what happens next clearly. Bend the long length about four or five inches or so up from the first series of bends as shown.


Then form another circle similar to the first one. This is a little more fiddly because you have to work round the other length of metal.


You'll end up with something like this. 


And then finally bend the length through 90 degrees, this forms the first 'prong'.


Nearly there. The other length needs forming but around the other way so in this case the second one will go anticlockwise. try and keep the bends close to the first circle of metal but again it's not super critical.


This is a close up view of the structure.


To make it fit on a length of wood you need to bend the structure apart slightly.


The idea is that when they come together they'll be trying to adopt this position and therefore grip the wood.


Use a pair of pliers or a junior  hacksaw to even up the ends of the 'prongs'.


Finished and mounted and the 'prongs' safely stowed in a drilled out cork.


I've left this one deliberately long because I see a use for this one at Cubs when they moan that the fire is too hot to hold a marshmallow near. This bad boy will hold 8 or 10 in safety. 


It is also great for buttered and sugared toast which brings back fond memories of Scout camps...It goes without saying that hot sugar is like oral napalm. If the fork can be mounted at a shallow angle it is good for draping bacon over and I'm currently pondering if it would be possible, with the addition of a couple of looped pins, to us it for ponnaced trout.

*Absolutely not true.


3.    


Ponassed Trout


Some time ago I did an article on how to ponass a trout for Scouting magazine, and more recently this technique featured in the Scout Association's Outdoor Adventure Manual which was co-produced with Haynes and featured loads of well known outdoor professionals (the Facebook page is here). Actually, despite supplying a new write up and images the original magazine article was re-used for some reason. The above right shot is me preparing the trout for the unused picture session.

So what is ponassed trout? Paul Kirtley has blogged about the history of this simple yet elegant technique and the kit needed is minimal; A hazel stick (about 3 feet in length and the diameter of a 20p coin), two smaller hazel branches about 6 inches or so in length, a knife, some string or nettle cordage, a saw and a fire.

Well I had a day off work so I decided to head down to my Scout HQ to get some practice in, and sort some dinner out at the same time (bushcrafters, want to light a fire on a whim? Have a look at this article). I used readily available shop purchased Trout (was it gutted? Yes, wouldn't you be if you'd been caught? Boom boom). As it was prepared that was one step bypassed.


After giving the  knife I was going to use a good strop I got the fire started so I could  build it up and allow some embers time to develop.


The preparation of the fish isn't too hard so I prepped the four sticks needed first. Fresh Hazel is a good wood of choice because it's non-toxic and splits fairly easily. Although it's usually straight this piece did have a slight bend to it, and although I could have straightened it after gently warming it over the fire, it wasn't a deal breaker. This was a three foot length which is a little long but this was on purpose because I want to cut a six inch length off the end to make a tool, but more on this later. Stand the remaining length of wood on the ground, place the knife blade in the centre of one end and gently baton the top of the blade with a stout piece of wood.

Pay close attention to the way the split is going and if it is running to one side angle the blade a little in the opposite direction. The split will need to be at least a couple of inches or so longer that the body of the fish (the distance between behind the head and just before the tail). The other pieces of wood are two thin 'kebabs'. They need to be pointed, about 5 inches in length, about 2-3mm in width and about a centimetre deep. The other is a tool to make a hole to support the Trout (a small pointy sticke) but this, along with the kebabs, are needed later.


With the of the four sections of wood prepped it's on to sorting the fish. I've got a freshly cut piece of conifer trunk but a regular chopping board or fresh bracken etc is ok too.


The first thing you need to do is make an incision at both ends, just after the head and gills, and just before the tail. The idea is to cut through the flesh al the way round but up to and not through the spine.Take care as a trout can be a slippery...Think twice, cut once.


And onto the process of parting the flesh from the bones. Note the position of my left thumb which is just sneaking under the bones which I guess are the equivalent of our ribs. Starting this off is a little fiddly but once you have got started a sweeping motion from near the spine outwards seems to work for me. 


And here's a shot once I've got going which shows my thumb about the start the movement away from the spine. Slow and sure is the key because whilst the finished double fillet will look a bit rough in places you are aiming to have as little meat as possible left on the bones. Once you have worked the bones loose gently ease the spine away.


Once you have done this cut the lower fins off, not just the 'finny' bit but a small circular piece of flesh around the fin (this removes some horrid little bones). Voila, a double fillet and a head, spine and tail combo similar to the classic cartoon one.


Now before the mounting of the double fillet a word about the hole digging tool ,mentioned earlier. This, as you may recall, is the bit of the longer length that was removed. I've carved a point at the bottom end, and shaved the edges of the top end so that when you baton it into the earth to make a hole for the 'Trout pole' to sit in it won't split.


Whilst the fillet is on the preparation surface of choice make four holes at the top and bottom (in the positions shown above) and engage the kebab sticks. The top stick is a little large but it doesn't really make much difference.


Take your split length of Hazel and open the split gently whilst lowering the skewered Trout fillet into it.


The top needs securing and a green nettle, stripped of it's innards, makes a good cordage for this purpose. The nettles weren't big enough so I used some pre-soaked jute string instead. This is why a few inches extra splitting is needed.

 I'll use this point in proceedings to tell you that I'm not really a fan of Trout...My late grandfather was handy with a gun and fly fishing rod and was a flipping Trout magnet and therefore I came to dislike the fish. I use a secret ingredient, namely Shwartz Season-all to pimp the flavour. At a guess it's about ninety percent salt so a little goes a long way but it is so nice with the Trout (and jacket potatoes for that matter). It is a staple for me in this outdoorsy spice holder.


I'd built the fire up with some nice seasoned pieces of Ash and a little fresh Apple wood for flavour and after making a hole with the tool fashioned earlier, I slotted in the Trout pole. Note the angle of about twenty degrees or so off the vertical. I've also got some rice on the go in a covered Crusader cup.


The cooking time is usually a few minutes depending on fire size, quality, angle etc but it's easy to check the fish is done with a little knife blade poke to check that it isn't opaque. The flesh behind the Hazel will look a little paler and wetter than the more exposed parts. Note that the Hazel pole will be rather warm when removed. To get the fish out cut the cordage and either ease it out or snap the split part carefully.


Two things happened  during the pole to plate period; I had a look round our HQ grounds for edibles and found around ten different plants. I chucked some Chickweed in to the rice at the last minute to wilt. Oh, and I dropped the ponassed trout just befoe landing it on the plate, hence it's rather dishevelled look!


You can see from the bit I've pulled away the seasoned and fire facing side, and the soft lighter coloured inner flesh. The image on the right is from one of the first bushcraft courses I went on but I've noticed that they are skin side down...To be turned halfway through? To crisp up the skin? i don't recall but I will ask the question.


I've also used this setup to cook bacon over the skewer parts, and it can be scaled up to accommodate a Salmon, as John Rhyder has done in this image. Find out why we has done this for the Scout Association here.


Tuesday, 10 October 2017

Roasted Nut Experiment


A slightly dull blog page title but I was thinking of a way of of avoiding some rather obvious nut double entendres. I have some Turkish hazelnuts lining a street near where I live and most people don't twig (excuse the pun) that it has edible nuts.

When Ray Mears did his Wild Food series with Gordon Hillman I was taken by a process for roasting hazelnuts using embers and sand. I have the book that accompanies the series ans whilst there is a long passage about the process it has no timings. I have recently visited the Lee Valley Almost Wild Camp so what better time to try this?

On the day I was going to collect the hazelnuts after work I noticed a squirrel nearby, usually they don't touch them (they have very hard shells) so as a back up I purchased some Cobnuts in case I was out of luck. I was lucky and found a lot of hazelnuts strewn on the floor in their peculiar casing with just the one split by a squirrel.


On the camp I laid out the two nut types ion four sections  with the idea being that each would be revealed after a certain time. Larger chestnuts can take as little as ten minutes so my timings were based around this..


I got a good supply of embers ready, then covered in a layer of kiln dried sand with probably a centimetre or so covering them.


 The embers were then raked over the top with a check to make sure that they were even in depth and spread.


Each batch was recovered after the set time, starting at, and going up in increments of five minutes.


The poll on my tomahawk proved a match for the super tough Turkish hazelnut shells. not a single one had a nut in so either the squirrels got all the good ones or they opened one and realised that it wasn't worth it, I hope it was the latter.


This is a half deshelled Cobnut around the five minute mark which was palatable but didn't seem that cooked.


The nuts pulled out at around the 12-15 minute mark seemed better. If you look closely at the left hand side (the area near the radicle) it appears that some oil has been liberated and it tasted warmed through.


I threw a handful directly onto the coals  for five minutes of direct heat but didn't find that they had changed significantly and one exploded. The Mears/ Hillman book suggested that the nuts were cooked and possibly stored for some time and some appear blacker than mine in the article.

In the video of the Wild Food programme Ray seems to build a big small stick fire but doesn't leave the embers on long, suggests that the nuts will have changed colour slightly and were a little scorched, covers the nuts with sand to the same level as I did (but I didn't line with sand underneath), suggests that they have had a quick cooking and that they taste of potato which mine did.

Maybe I've roasted them to an eat know level like a street vendor would have done and perhaps a longer roast experiment would be worthwhile...Sadly that now won't happen until next year!


On a recent visit to the Yorkshire museum in Museum Street, York in noticed some charred Hazelnuts in the Roman section which were described as charred remains but the shells were whole. This prompted me to think that these nuts were actually charred by the roasting process and I contacted the museum about this.

I took what I'd noted and recently reprised the timing experiment on this camp but I laid the base sand in the fire pit area so it was already good and warm. I personally think the magic number is fifteen minutes or so of cooking time.