Thursday 6 January 2022

Air Dried Duck


I've had my ProQ cold smoker for a few years now and it's something I use often, the smoke marks inside are testament to this. My love of this compact piece of kit was born from attending a Coldsmoking.co.uk course a few years ago.

They have kept their online shop and now stopped their physical courses in favour of  building their Youtube platorm with instructional stuff. I was due to attendant a charcuterie day until you-know-what took it down and part of the day was talking about air-dried duck breast. They have now moved online and have a great Youtube channel and one thing that they have posted is how to do cured and smoked duck breast. 

I'm actually not a fan of duck, outside of the crispy one you get in Chinese restuarants, but equally I recall trying a Venison version of this and liking it so caution to the wind I gave it a go. I double checked the information needed on the three part video and got going.


Turan (the guy who runs Coldsmoking) used citrus zest, Thyme and Juniper berries but I decided on Chinese style flavourings because as I've mentioned it's what I usually have. I went for a teaspoon-and-a-half of five spice powder, a little grated ginger and a small amount of oyster sauce with the sea salt, the idea being if the duck wasn't to my taste, or more probably my family's then I could pan fry it and have the afore mentioned pancakes.


I took the tried and tested route of purchasing a couple of skin on, de-boned breasts from a supermarket.


The breasts both had the thicker fat, plus 'flappy bits' trimmed and were then carefully dried in kitchen towel.


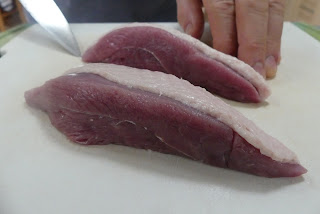
This is the pair of breasts having had the trimming and drying finished and are now ready for the marinading.


I mixed the pre-measured salt and spices together in one bowl with a teaspoon.


Once I'd applied the oyster sauce (literally enough to cover the breasts) I then applied the dry mix, which stuck to the sauce rather well!


After the mix was applied to the flesh and a little to the skin (75%:25%) I popped it in a vacuum sealer bag to maximise the contact between breast and flavourings and popped it in the fridge for 24 hours. 


Even at the halfway mark it was clear to see how much liquid had been drawn out into the vacuum bag.


Once removed the breasts were washed to remove the salt and mix and again patted dry ready to be covered.


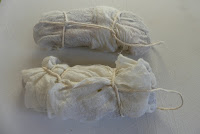
I cut and trimmed a sheet of muslin to individually wrap the breasts  up and used the classic butchers/ parcel knotting to secure them with a hanging loop for the drying process.


The weather at the time was really chilly so I could alternate hanging them for around five days between my garage and outside utilising a screw in my fence which was better than having to hang them in an improvised way in my fridge.


When the time was up they both had a very definate look and feel of bacon about them (bacon blog how to here and video how to here), not surprising seeing as the process is similar.


And so onto the cold smoking which had mentioned earlier on. I did about four hours smoking with oak dust. Again note the bacon-like appearance of the meat.


Another mention of bacon as I started cutting it: Surprise, surprise it cut like bacon. 


Using a sharp kitchen knife meant that I could get some respectably thin slices out of the two breasts. So the taste, the family varied between a flat refusal to putting a couple of molecules past their lips and to be fair it's not something that I think I would redo, having bacon on the brain meant that I rather focused on the texture in the mouth.

So as you can possibly guess the meat became very posh Chinese panckakes! 


Monday 13 September 2021

Atlatls, Woomeras, Propulseurs and More


Just like my Dutch (Swiss) arrow video, this subject is an itch I've been wanting to scratch for some time. I did make an atlatl set with Will Lord in 2016 which l blogged about here but l decided that if l was doing a video/ blog that l'd cover it properly and feature styles from around the world.

So the video covers the various styles being used 'in action and this blog covers the making of the atlatls.

The name is actually what the Aztecs called the device and It's almost become a catch-all name for all styles which l will use a general term hereonin.


The first one l made was a 'stone age' atlatl. I found a slightly curved piece of wood that had actually started to split centrally along It's length so l decided to utilise it.

Once fully split the wood revealed a little spalting which was a nice bonus. Once the shaft was sanded I added some Auroch and Fallow deer pyrographic cave art as an embellishment which I based on real cave I'd seen.


 I decided to use some pyrotised (fossiled) wood for the point, it actually sands quite easily and of course It's a little artistic embellishment as this wouldn't have been formed when these were used!

I bound and sealed the point with Lime bast cordage and pine pitch tar and left the handle unwrapped to show the spalting.


The other piece of spalted wood became an American 'basket maker' style atlatl. This style features a finger loop style grip and what is called a banner stone. There are several theories as to what role the stones perform; a counter balance for a weighty projectile,  to add measuring a launch, to help silence the movement and a charm being the popular ones.

The material l've used is soapstone which is essentially talc in stone form so is quickly and easily shaped. I cut a small depression for it, glued it with a little pine pitch tar and added some artificial sinew at either end.

The finger grips were leather thongs wrapped around metal rings and bound to the main body.


The atlatl that took the longest to make was the Australian Woomera. This was made from some salvaged pine taken from a Christmas tree delivery palette.

I cut the basic shape out and sanded it first. I then painted the main body to sort of look like a genuine ochre covered one by mixing a paint test pot and some modeling paint together. Then the black bits were added (to represent the gum used). 


The grey tip which represents a basic stone tool that l added a 'knapped' texture to with a crook knife

The point is filed bone, the handle wrap is veg-tanned salmon skin leather and both tip and handle are finished off with artificial sinew (which would have been Kangaroo tendon).


Onto a French atlatl version-the propulseur. This type was usually made with an animal or bird  adornment which often had the point formed from a beak, tail etc or as a standalone point. 


I added some colouring to the shaft with some easy to make DIY onion dye giving a lovely yellowy/ orange hue. The point is bone held in with pine pitch tar.


I painted my boar with some of the afore mentioned model paint after dying the shaft and then bound the handle with some veg-tanned Chamois leather.


This launcher us one I've had in mind for ages. I found a massive crab claw some time ago and had a lightbulb moment to save it and use it for an atlatl point. Latterly l found a thin Ash sapling with a large branch growing parallel to it which l thought was perfect.


I did however procrastinate so that when l got myself together to start this project l had left the wood outside and misplaced the crab claw. I therefore gave a newer but smaller claw replacement and garnished the wood to give it a bit of strength. The handle is wrapped with around 6 feet of 2 ply corn husk cordage.


To add a modern twist l did a black 'tactical one. This again is made from reclaimed pine, has a headless screw for a point (held in with two part glue), a hi-vis nylon cordage grip and a resting poibt for a projectile, something I've not found in more traditional designs.This model is again, pine and has a very modern 'tactical' look about it. 


And finally there is a strung design that launches a projectile in the same way as an arrow via a nock. (it's the white fletched one on the far righ in the picture bellow). This is a Willow fork which has had the bark left on the handle and natural cordage string used in the v shape and a decent length wrapped around the top of the handle for spare.


Suggested Further Reading:-


Friday 30 April 2021

Polaris Bushcraft Spring Forage.


For me there are several components that constitute a good forage; A knowledgeable lead, plenty to see, lots of information, stuff to try and a parachute covered fire to sit round. My recent Polaris Bushcraft day ticked all the boxes.

Polaris Bushcraft was formed by Graham Couling and is not only the only bushcraft school near me but it is also only 15-20 minutes from my house and very close to my 'homework wood' that I selected for an online tree and plant masterclass I signed up to during my six month paid work sabbatical. It is also near a train station and is close enough to walk to but equally I didn't hear a train all day which was good.

There were roadworks last time l visited my afore mentioned 'homework wood' which necessitated a large detour so even though it wasn't far l gave myself plenty of time. Typically there were none and l breezed through to the site in double quick time.

The instructions said that the turning is easily missed and as l approached l spotted it but decided to overshoot just to double check it and then found a place close by to turn round. When l did so and pulled in there was a vehicle in situ by the gate, it was instructor Graham.


I nipped up to the driver window to say 'Hello' and explain why l was early and once l was parked up Graham pointed out a large expanse of the 45 acre wood l could mooch about in whilst he and wife Natalie got the base camp ready. 


Pretty soon others arrived and after doing a bit of filming for the accompanying YouTube vid l had a quick chat with them. Whilst doing so l was getting a faint whiff of camp fire smoke which was making me keen to get in. Soon enough both of them appeared and it was a very short walk to a handsome parachuted base camp with a substantial field kitchen and various debris shelters from other courses about the place.

There was a Muntjac gate guardian and I was also the only one to bring a chair but there are wooden stumps to sit on. We had time for brew whilst Graham did a rundown of the itinary and then we were off. 

The first stop was just a few metres from the base camp and Graham, ably assisted by Natalie, then went from flower to plant to tree and gave some background to their edibilty, toxicity and uses. Graham often referred to a well worn journal and often produced facts and figures that he'd researched and there was a nice injection of light humour in proceedings too. It was also noticeable that we'd been out for a while and were still just skirting the edge of the camp which told a great deal about the health and diversity of the flora.


 During the morning several ancient woodland indicators were pointed out which included Wild Service trees (Sorbus tormentalis) which is a favourite tree of mine and indeed l did an article on it in the Winter 2016/ 17 issue of Bushcraft magazine after studying it closely in my 'Homework wood' (tree blog here).


After a morning that provided plenty of species we reconvened at basecamp for our packed lunches and another brew before a short walk to the camp edge, this time armed with digging sticks to mainly forage Pignuts (Conopodium majus) which were munched there and then and Lesser Celandine (Ficaria verna) which would need roasting in the embers. One find that caught my eye was a recently discovered patch of Solomans Seal (Polygonatum multiflorum)...Another ancient wood indicator. 

Thereafter it was a mix of trying different concoctions and treats that Graham and Natalie had bought along, everything from Dandelion syrup to fried Ground Elder (Aegopodium podagraria) at the basecamp. The roots of the Lesser Celandine  where quite fiddly to roast and I elected to wrap mine in a Ramson leaf before inserting into the ashes, which worked but of course it added  garlic taste to the roots! 

I had harvested some Few-flowered Leek (Allium paradoxum) and brought it along for them, I was also going to bring some Alexanders stems but decided me just rocking up with an Apiaceae lacking most of it's ID features perhaps wasn't a good idea. They had put some teaser posts of the stuff they were bringing on social media and I re-posted it and a neighbour saw it and offered me a Duck or Pheasant to bring


Overall I think the day was well pitched to cater for both keen hobbyists like me as well as not overloading a curious newbie, the woods are gorgeous and the pair of them had really put a lot into it including the baking and preparation. I can't really do the day justice in this short blog writeup but you can get more of a flavour watching the accompanying video and even that is about 90 minutes of video distilled into circa 17 Youtube minutes and also includes a quick Q & A with Graham. During the video I get ribbed as to why it took me so long to find them and I realised the irony of Polaris being a navigation guide and yet it took me a decade-and-a-half to get there. 

The link to the foraging video can be found by clicking here, and I've also included the full Q & A I did with Graham which is nearly eleven minutes long which details the genesis of him and his bushcraft school here